Workflow

The contents of the Workflow tab are highly customizable and can be configured to the specific needs of the client. The workflow folders are listed in the order documents move through the workflow.
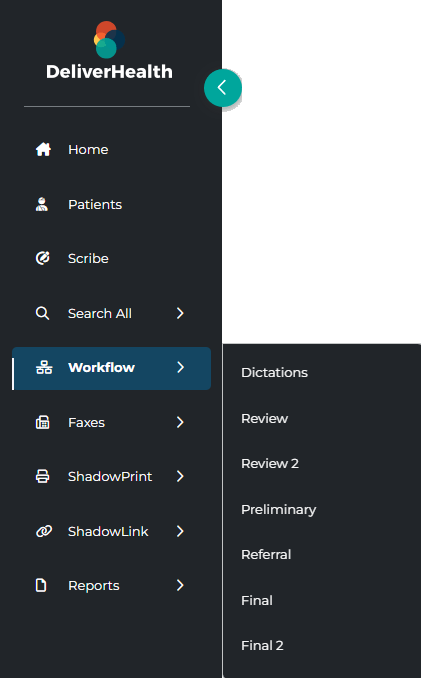
The Dictation status folder is always active, but all other folders in the workflow may not be in use by the client or can be made unavailable to specific users. Folders that are not in use or the user does not have access to cannot be opened and are gray-out in the Workflow Summary. The names of the workflow folders can be renamed by the client administrator, but their function and place in the workflow will remain unchanged.
Each workflow folder has a specific purpose. An example of the typical workflow and folder usage is:
- Dictations - The dictation is going through the document creation workflow and is not yet available for review.
- Review - Both review folders are typically used by administrative staff to make edits or answer outstanding questions prior to review by the provider..
- Preliminary - The medical provider reviews, edits, and signs notes.
- Final - Used by administrative staff to print, fax, and distribute the notes.
Each accessible folder can be opened from the Workflow Summary on the Home tab and along the top of each workflow folder, or by choosing it from the Workflow menu in the left-side navigation menu. All notes in the given folder will automatically load in the data grid. Additional filters can be applied to further refine the data. See Refining Workflow Folder Lists for more details.
The default action in all workflow folders, except for Dictations, is Edit. A note will open in edit mode when clicked anywhere in the row, except for the Actions column. See Note Editor for details on editing notes.
To view a note click View Note in the Actions column for the given note. Additional actions can be selected from the Actions menu. An action can be applied to multiple selected notes using Bulk Actions. See Workflow Actions for more details on available actions.
Workflow Folders
Dictation Status
Notes in the Dictation Status folder have recently been uploaded and have not been delivered as completed documents. Two actions can be performed on dictations that are in the Dictation Status workflow folder.
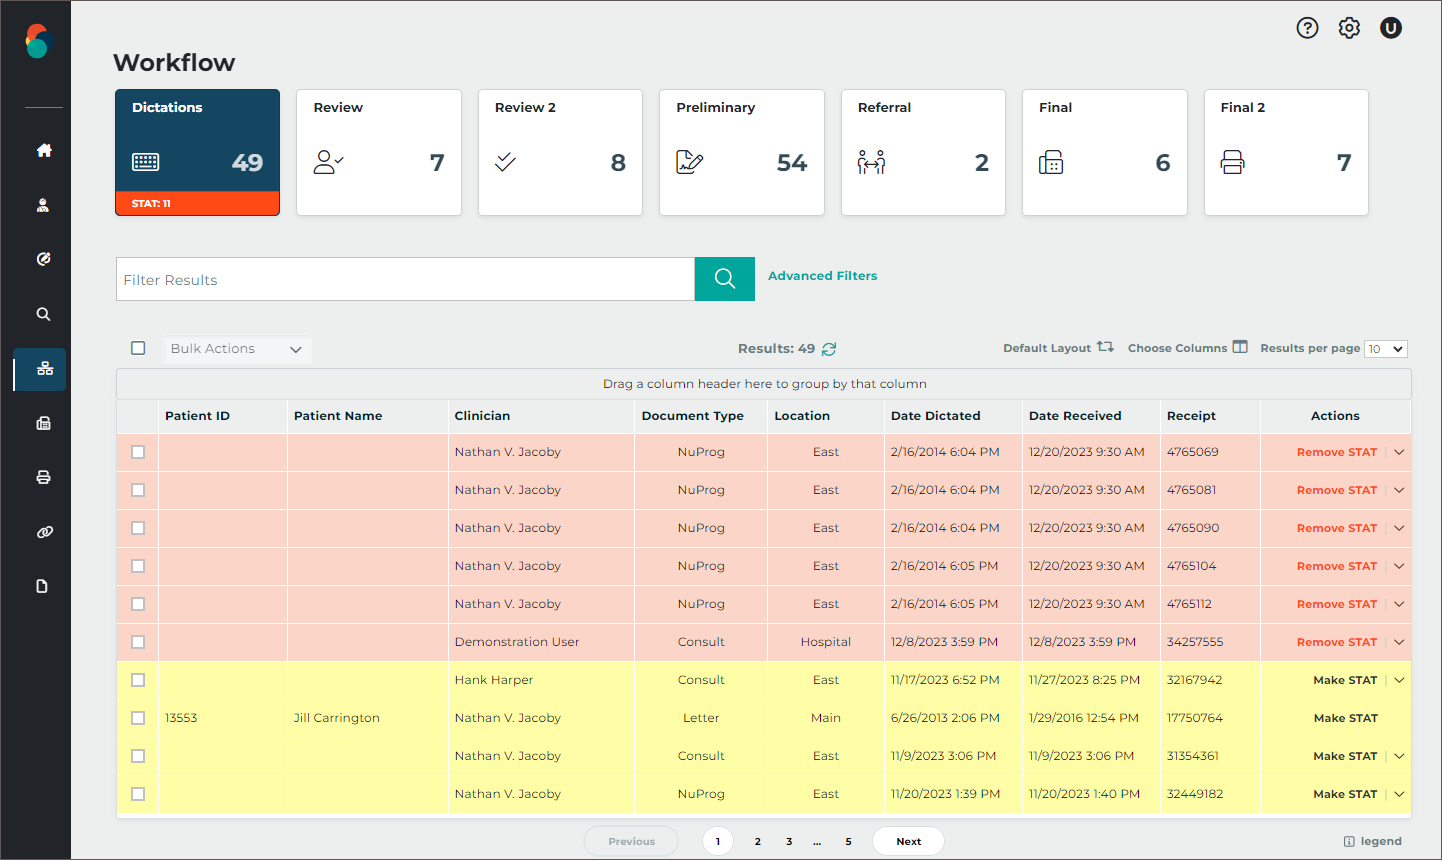
 Toggle STAT Status
A Note can be marked as a higher priority dictation. Notes marked STAT are completed before other notes and may have a higher cost per line. The STAT status can be toggled with "Make STAT" and "Remove STAT" in the Actions column. Notes that are highlighted in pink have been marked STAT (the color is customizable by the client and will be reflected in workflow folder legend).

Play Dictation
Expand the Actions menu and select "Play" to open and listen to the dictation in a new web-browser tab. Playback buttons and keyboard shortcuts are available for play, pause, rewind, and fast forward. Foot pedals that are capable of being configured to send specific keystrokes can be used for playback controls as well. Please refer to your foot pedal manufacturer's user manual for assistance in configuring shortcuts. Dictations are stored on the eSOne system for 90-days and cannot be played after that time. The Play option will not appear when the dictation is not available.
Marked for Review
Notes in the Marked for Review and Marked for Review 2 folders have been delivered to the client, but may require additional edits from staff members. Comments or comment tags are commonly added by the transcription company or validation rules detailing why the document was selected for the Marked for Review folder. Access to view comments must be granted to InQuiry users and is disabled by default. Notes printed from the Marked for Review folders include a "Preliminary" watermark by default.
Preliminary
Notes in the Preliminary folder are ready for provider review. If the provider is using the electronic signature option, completing documents from the Preliminary folder applies the electronic signature to the document. If multiple signatures are required, such as a resident and attending physician (authenticator), the signatures must be applied in order. The note will not appear in the Preliminary folder for the authenticator until after the resident has reviewed and signed the document.
The Preliminary folder is the last folder in the workflow that users can edit notes without additional security access. Notes in the Preliminary folder print with a "Preliminary" watermark by default.
Dual Resident/Attending
If the 'Dual Resident/Attending Workflow' option has been enabled for the client, attending physicians (authenticators) will be allowed to complete documents in the workflow even if the dictating resident has not yet reviewed or approved the document. A note requiring an extra signature(s) will appear in the resident's and attending's Preliminary folders at the same time. Either the dictating resident or attending physician can review and edit the document.
Note
The attending physician should not have proxy to the resident dictator when this workflow is enabled.
When the Dual Resident/Attending workflow is enabled, a new column named 'Review Status' will appear in the Preliminary workflow grid showing one of two statuses:
- Outstanding – the note has not been completed from the Preliminary folder by the dictating resident or attending. The text color of this status can be changed using the new 'Dual Resident/Attending Color' option in Workflow Settings.
- Reviewed – the note has been approved by the dictating resident from the Preliminary folder. Or, in the case of multiple authenticators, one of the authenticators has completed the dictation. (This status will not show for the resident.)
Only jobs requiring more than one signature will display a value in the 'Review Status' column.
There are two paths this workflow can follow:
-
Resident reviews then attending completes.
-
When the note is 'Outstanding', the resident can review and approve the note. After the resident completes the job, it is removed from their Preliminary folder.
-
The attending will still see the note in their Preliminary folder with the status of 'Reviewed'. The attending can then complete the note and it will move on to the next workflow folder.
-
-
Attending completes an outstanding note.
-
An attending can complete an 'Outstanding' note prior to the resident reviewing/approving the note.
-
Once the attending completes the job, the note moves on in the workflow and out of their Preliminary folder and the resident's Preliminary folder.
-
If there is more than one attending on the dictation and the dictation has a status of 'Outstanding', the resident and all attendings can see the job in their Preliminary folders. Attendings can sign in any order.
If there is more than one attending on the dictation, and one of the attendings completes the dictation before the resident reviews it, the job is removed from that attending's Preliminary folder, as well as the resident's folder. The dictation will remain in the Preliminary folder for the other attendings with a status of 'Reviewed'.
Referral
The Referral folder contains notes the provider has been copied on as a referring associate.
The Actions column will display one of two statuses:
- preliminary - The note has not been completed from the dictating provider's Preliminary folder; changes could be made to the note prior to being finalized.
- note - The note has been completed from the provider's Preliminary folder.
Notes can be read, printed, and completed from the Referral folder, but not edited. Notes printed from the Referral folder while still in the dictating provider's Preliminary folder will print with a "Preliminary" watermark by default. Those that have been completed from Preliminary will not have a watermark. Completing notes from Referral will not advance them in the dictating provider's workflow, but will remove them from the Referral folder.
Final
Notes in the Final folders have been authenticated by the provider. Notes are prepared to be printed for the chart, paper record, or to be sent to referring associates who receive their copies by mail. Notes in the Final folders print without a watermark by default.
After notes are completed from the last workflow folder they will only be found in the Repository (Search All).
Refining Workflow Folder Lists
When a workflow folder is opened, an initial auto-search runs to return all notes in the given folder. The Search folder box or Advanced Search can be used to refine the list of notes or find a specific note in the data grid. The matching data will be highlighted in yellow in the grid. However, the Date Dictated column will not include highlighting for filter matches.
Use Advanced Search to choose specific data fields to search, or the Search folder text box to filter across all data fields or a specific field.
Advanced Search
 Click the Advanced Search slider to toggle the Advanced Search panel on and off. Advanced Search is off by default. The Advanced Search panel can be toggled off after submitting search criteria without losing the selected search data.
All fields in the Advanced Search panel are optional and will search only the notes in the given workflow folder.
- Contains - Filter by full or partial data to match in all or a specified field of the notes in the workflow folder; criteria entered here will also appear in the Filter Results text box above the data grid. See Filter Results below for additional details.
- Patient ID - Filter by the patient's full or partial MRN.
- Patient Name - Filter by the patient's first, last or full name. Partial and full matches will be returned.
- Clinician - Filter results based on the dictating clinician. To search for a clinician in the list, enter a sequence of characters in the search box. The more characters you enter, the more refined your search becomes. You can use alphanumeric and special characters, including spaces, apostrophes, and parentheses. Both first and last names are searched.
- Location - Select a location to filter on based on the visit location. Only locations assigned to notes currently in the workflow folder will appear in the selection list. Select "All" to include all locations in the folder.
- Document Type - Select a document type to return notes with that document type. Only document types assigned to notes currently in the workflow folder will appear in the selection list. Select "All" to include all document types in the folder.
- Additional Authenticator - Select one or more authenticators to filter notes where the provider is an additional signer. Only providers who are authenticators on at least one note in the given workflow folder will appear in the list. If a provider name does not appear, they are not an additional authenticator on any notes in that folder.
- Comment Tags - Select one or more comment tags to filter notes that have those tags applied. All available Comment Tags are displayed, even if no notes in the folder currently use them. Workflow folder filters can be set proactively. When a Comment Tag filter is applied, newly added notes will automatically appear or be excluded based on the selected tags as they enter the folder. This field is not available in the Referral folder.
- Date Type - Choose the date type to search: either Date Dictated or Appointment Date. After selecting a date type, enter a date range to filter notes based on the chosen field. Both date fields are optional; you may submit a start or end date without the other, making the range open-ended.
- Previously Viewed - Available only in the Referral folder. When checked, the search results will include notes that match the other search criteria, including notes that were completed from the Referral folder previously and those still in the folder. When unchecked, only notes currently in the Referral folder will be included in the search results.
Note
Criteria entered in "Contains" will search within all data fields, regardless if they are displayed in the data grid. Please note that this behavior is different in the Search All tabs. An advanced search is required and only columns in the data grid will be searched for matches in Search All.
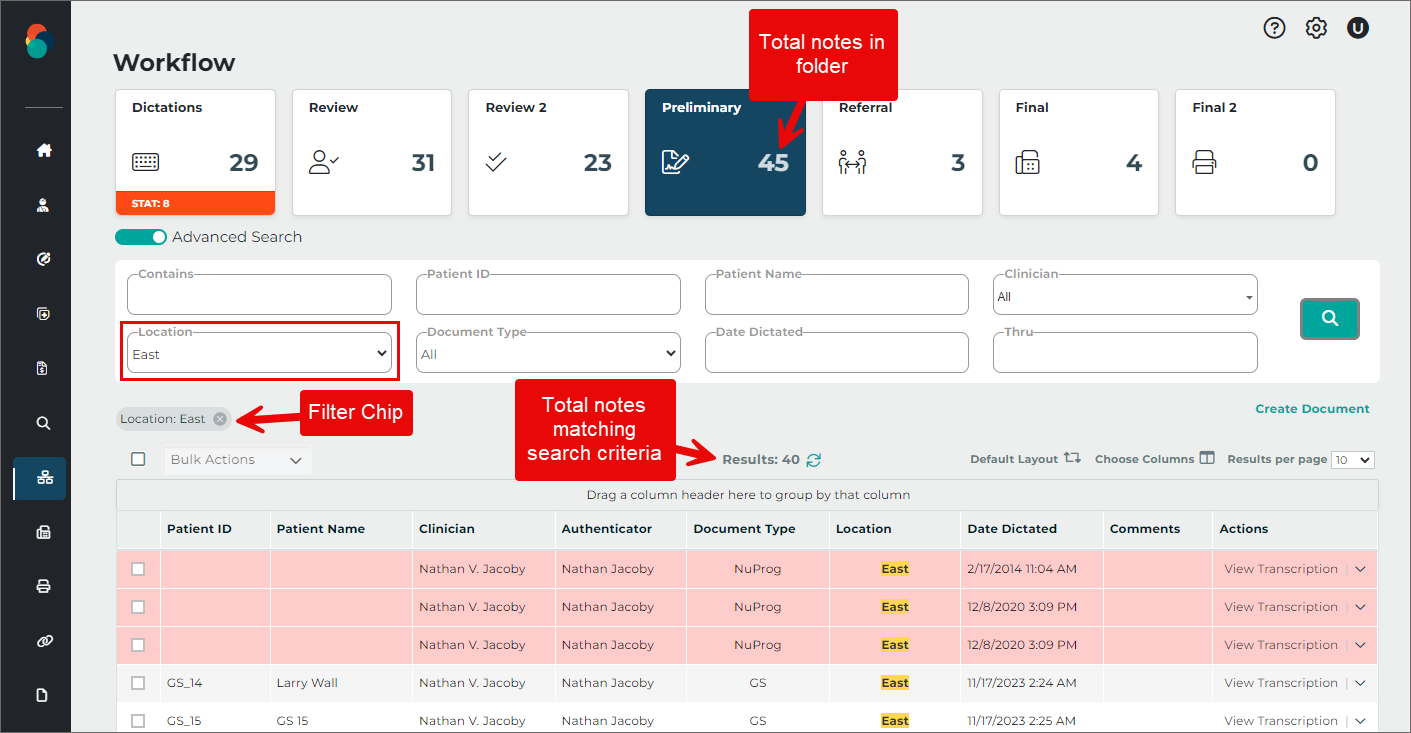
The Advanced Search criteria will be copied to the Filter Results text box (visible when Advanced Search is toggled off). A filter chip will also appear for each criterion. To remove a single filter, click the X next to the criterion; the search results and Advanced Search panel will be updated accordingly. Click Clear all to remove all search criteria; all notes in the folder will be displayed in the data grid.
In the example below, the Preliminary folder has 45 notes awaiting approval. Searching for the location "East" returned 40 records.
Filter Results
Filters can also be applied using the Filter Results text box, visible when Advanced Search is toggled off. Criteria entered in the Filter Results text box will be compared to data in any available field for the data grid, regardless if the field is in the grid or in the "Choose Columns" list. Any partial or full matches will remain in the data grid and non-matches will be filtered out.
Continuing the example from Advanced Search above, the location filter has automatically been copied from the Advanced Search to the Filter Results box. Because the filter was applied to search within a specific data field, Location, it is formatted in the Filter Results box to indicate the field being searched and the data being searched for. The same format used for the Location filter can be applied to any other field and will only look for matches in that particular field. Call out the field name in quotes, followed by a colon, then the data in quotes. The field name must match the header in the data grid.
For example, to find records with "123" in the Order Number field, enter "Order Number":"123". The results filtered down to 2 records.
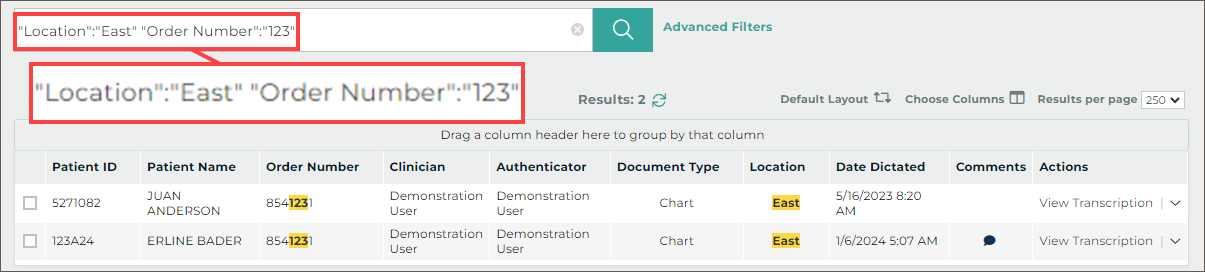
Note that the Order Number column was added to the grid for visual purposes, but the same two results would still be returned if the Order Number column was not in the data grid.
To filter across all data fields in the grid, enter the criteria in the Filter Results box (or the Contains field in Advanced Search) without the field formatting. Removing the Order Number filter and adding "123" in the example returned 4 records with "123" in multiple data fields and "East" for the location. Also note the Order Number filter can be removed by deleting it from the Filter Results box, deleting the filter chip, or toggling on Advanced Search and deleting the filter from the Contains field.
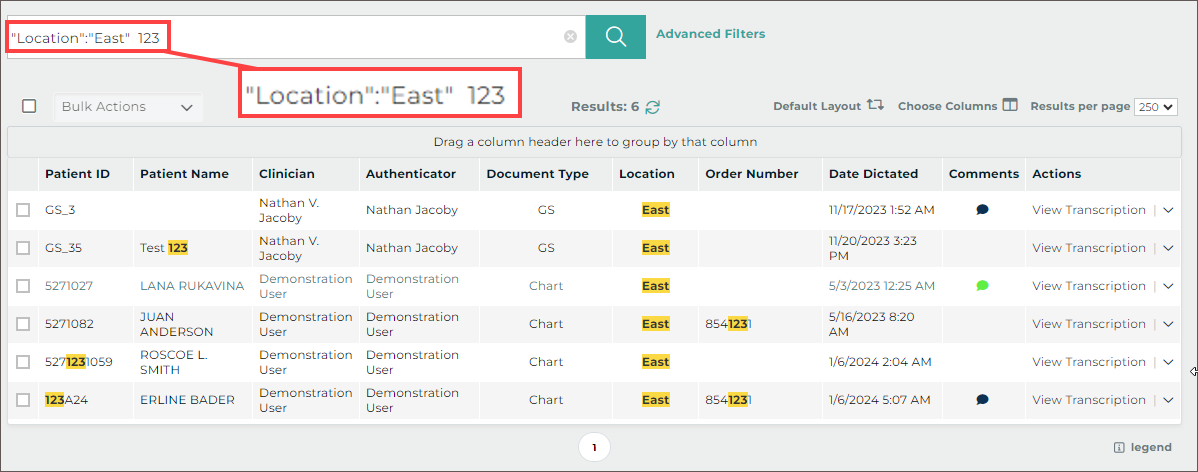
Filters in the workflow folders apply to all columns available for the data grid, which includes fields in the data grid and fields in the "Choose Columns" list. In the example, the first two results do not have "123" highlighted in the grid. This means "123" is found in another field that is not in the grid. For these particular notes, "123" is found in the Comment and Receipt fields.
Multiple filters can be applied by separating the filters with a space. All criteria must be met. For example, filtering the workflow folder to the "East" Location, "123" in the Order Number, "Chart" Document Type, and "Mel" in any of the fields returned 1 result. The comment text contains "Mel", which is why the note was returned, even though the field was not in the grid.

When the "Comment" column is added, "Mel" is highlighted.

Notes can easily be located by Note ID or Receipt Code by entering the data in the Filter Results or Contains filters, even without the TID and Receipt fields in the grid.

Data Grid
The data grid displays notes that match the filter criteria and can be customized by changing the included fields, grouping, sorting, and how many results are displayed on each page. Actions can be taken for individual notes or in bulk by selecting multiple or all notes.
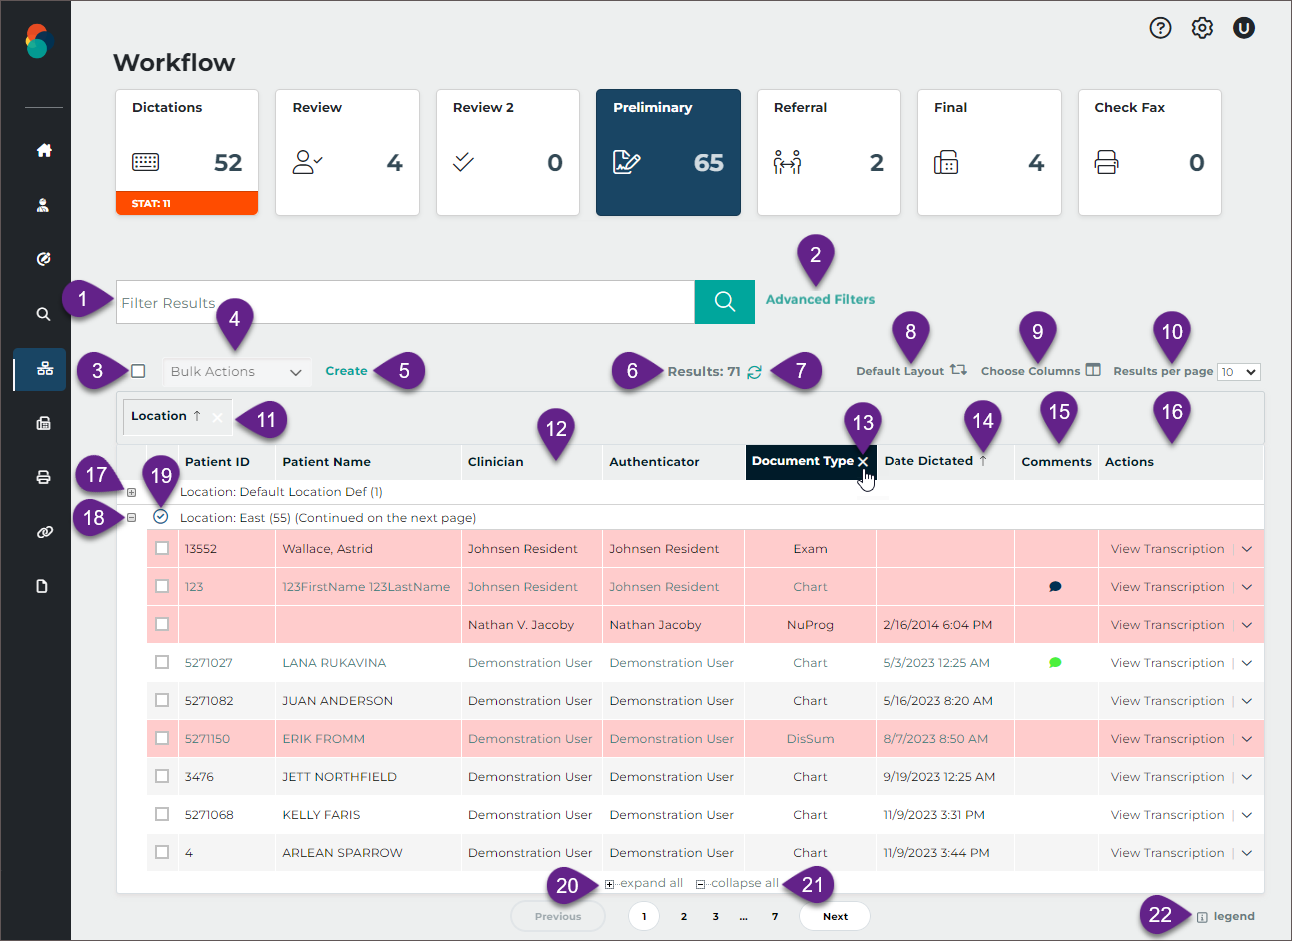
- Filter Results - Allows filters to be applied to the notes in the folder. See Filter Results for more details.
- Advanced Search - Opens the Advanced Search window to specify filter criteria. See Advanced Search for more details.
- Select All - Toggles between selecting and unselecting all notes on the current page of the grid. Notes on prior and subsequent pages are not selected. Notes in the "Dictations" status will not be selected with this option because bulk actions cannot be applied to dictations not yet typed.
- Bulk Actions - Choose an action to apply to selected notes. See Workflow Actions for more information.
- Create - Create a new note without a dictation. The note editor will open. This option is only available in the Preliminary folder and Patients tab if enabled for the client and user.
- Results - Displays a count of matching appointment records.
- Refresh - The refresh button performs a search for all jobs in the folder and re-applies any filters.
- Default Layout - Resets the data grid to the default layout, removing any changes previously made to the included columns, grouping, and sorting.
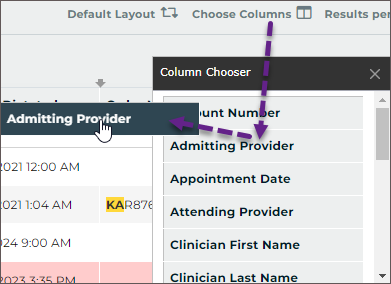
- Choose Columns - Opens the Column Chooser. Drag columns from the chooser to the desired location in the grid to add a new column. Drag a column from the grid to the Column Chooser to remove a column. Filters will apply to all fields in the grid and in this list, unless a specific field is called out in the filter.
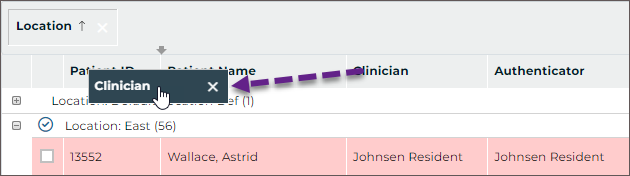
- Group - Drag any column header from the grid or Choose Columns window to the grouping row to group the results based on that data criteria. For example, drag Location to the grouping row to group all appointments at the same location together. Multiple groups can be added. Groups will automatically be used to sort the data. Click the group column to toggle between ascending and descending order.
- Reorder - Drag and drop columns to reorder grid columns.
- Remove Column - Hover the mouse pointer over the column header and click X, or drag the column into the Choose Columns window to remove it from the grid.
- Sort - Click any column header to sort results by data in that column. Click the column header again to toggle between ascending and descending order. The sort order will be identified by an up arrow (ascending) or down arrow (descending). To sort by multiple columns hold the Shift key while clicking the column headers; data is sorted by the first column added to the sort, then by the second column added, and so on. To remove the sort from a column hold the Ctrl key while clicking the column header.
- Comments - The Comments column in the grid opens the Comments dialog, allowing you to view, edit, or remove comments and comment tags. See Comments below for more information.
- Actions - The Actions column displays the status of the note and allows actions to be taken. If the note is in the workflow, the name of the folder will be displayed; if the note has completed the workflow, "Search All" will be displayed. Click
 to view additional actions that can be taken. See Workflow Actions for more information.
 - Expand Group - Click + at the head of a collapsed group to display all records within the group.
- Collapse Group - Click - at the head of an expanded group to hide all records within the group.
- Toggle Group Selection - Click to select/un-select all notes in the group.
- Expand all - Click to display all records for all groups.
- Collapse all - Click to hide records for all groups.
- Legend - Opens the legend for color-coded notes. See Legend for more information.
Comment vs Comments
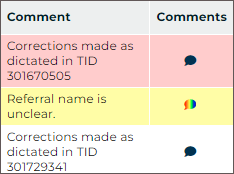
The Comments column is in the default grid layout and displays an icon when a note has a comment and/or comment tag. The icon can be clicked to open the comment/tags window.
The Comment column can be added to the grid and will display the comment text, but not comment tags.
Legend
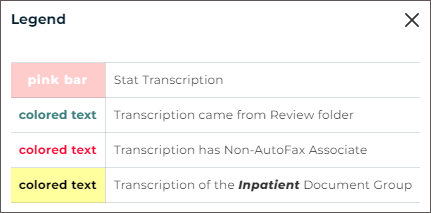 The background and/or text color of each note line item in the grid may indicate a specific group or priority status of the note. To open the legend for these color codes, click on legend in the bottom right corner under the grid. Some color indicators, such as Non-AutoFax Associate and notes coming from the Review folder, will not apply in the Search All folder, but will apply in the workflow folders. Colors and document groups can be customized per client and may not match what is shown here.
Comments
If a note has a comment and/or comment tag(s), an icon will appear in the Comments column. Click the icon to open the note's comment window, where you can view, edit, or delete the comments and comment tags. Only users with the appropriate permissions will see the Comments icon and be able to open, edit, or delete comments and comment tags.

There are three different types of comment icons to indicate the type/number of comments on the note:
 A black-filled comment icon indicates a typed comment has been added to the note.
 A color-filled comment icon indicates a comment tag (a predefined comment) has been added to the note and a text comment may also be included. A different color can be assigned to each comment tag; if only one comment tag appears on the note then the color assigned to that comment tag will fill the comment icon.
 A rainbow-filled comment icon indicates multiple comment tags have been added to the note and a text comment may also be included.
Workflow Actions
A variety of actions can be performed on notes within the workflow. While many of these actions are available in both the Note Viewer and Note Editor, they can also be accessed directly from the workflow folder. Certain actions are only accessible from the workflow folder.
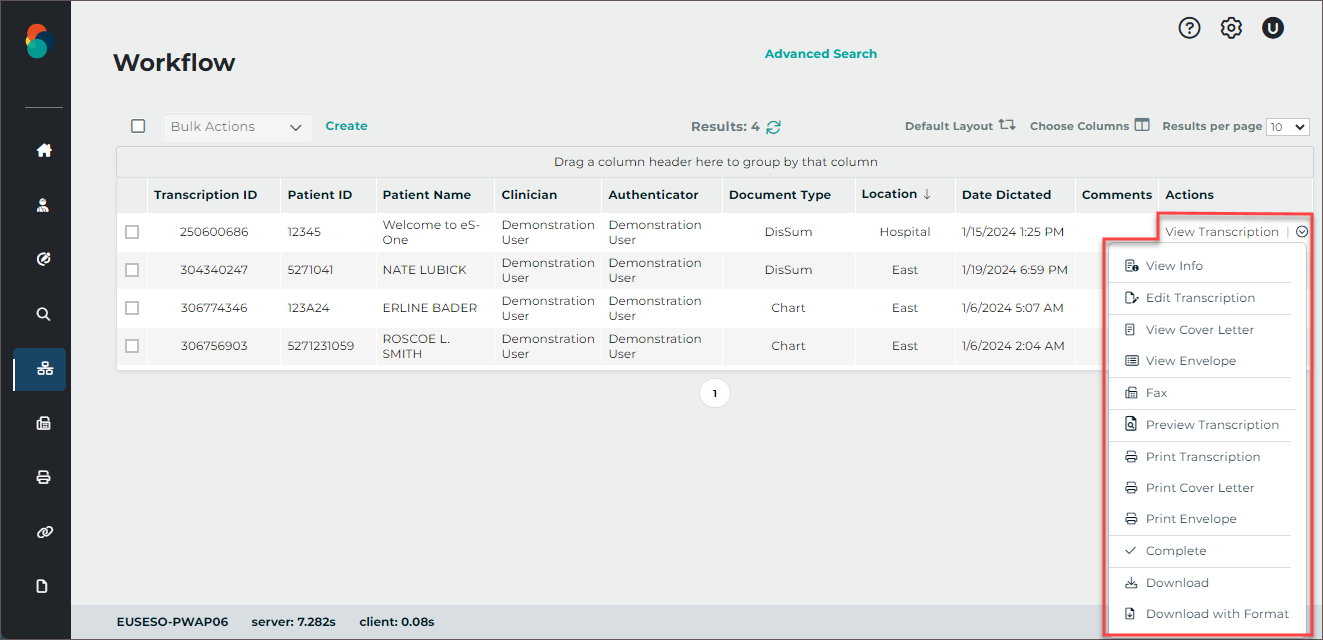
The Actions column in the workflow folder grid displays the "View Note" option. Clicking "View Note" will open the Note Viewer. Clicking anywhere else on the record will open the Note Editor.
The Actions column also provides a menu of available actions for the selected note. The available actions may vary depending on user access and the specific workflow folder. Click to view the full list of available actions for the note.
The following workflow actions are applicable to all workflow folders except Dictations and Referral. However, some options may not be available depending on client and user configurations. For available actions in the Dictations and Referral folders, refer to Dictation Status and Referral, respectively.
| Action | Action Description | Action Location |
|---|---|---|
| View Note | View the note contents in a separate web-browser tab. | Actions column |
| View Info | View additional dictation and note information. | Actions menu Note Viewer |
| Edit Note | Edit the note text, demographics, referrals, signatures, and more. | Click the grid row Actions menu Note Viewer |
| Play | Opens the dictation playback control in a new web-browser window. | Actions menu Note Viewer Note Editor |
| View Cover Letter | Opens a preview of the document cover letter(s). Cover letters are only generated for associates on the note who receive documents by mail. Specific dictators or document types may not generate cover letters. | Actions menu |
| View Envelope | Opens a preview of the document envelope(s). Envelopes are only generated for associates on the note who receive documents by mail. Specific dictators or document types may not generate envelopes. | Actions menu |
| View Patient Letter | Opens a preview of the patient letter. | Actions menu |
| Fax | Opens the Fax on Demand dialog window. When opened from Bulk Actions, all selected notes will be faxed to the same associate. | Actions menu Note Viewer Bulk Actions menu |
| Preview Note | Opens a rendered preview of the note in the InQuiry Printing Agent. | Actions menu Note Viewer |
| Print Note | Prints the note from the InQuiry Printing Agent. | Actions menu Note Viewer Bulk Actions menu |
| Print Cover Letter | Prints the cover letter and note from the InQuiry Printing Agent. | Actions menu Bulk Actions menu |
| Print Envelope | Prints the envelope from the InQuiry Printing Agent for the patient and/or associate. Specific dictators or document types may not generate envelopes. | Actions menu Bulk Actions menu |
| Print Patient Letter | Prints the patient letter and envelope from the InQuiry Printing Agent. | Actions menu Bulk Actions menu |
| Append | Add, edit, or remove the append chain. An append chain is two or more notes linked together and printed as one document in the configured order. | Actions menu Bulk Actions menu Note Editor |
| Complete | Completes the note from the current workflow folder and progresses to the next stage of the workflow or to the Search All repository. | Actions menu Bulk Actions menu Note Editor |
| Download | Downloads a PDF file of the note. This option is only available for notes in the Preliminary folder. | Actions menu Bulk Actions menu Note Viewer |
| Download with Format | Opens the Select Format window to download the note in PDF or DOC format. | Actions menu Bulk Actions menu View Note |
Play Dictations
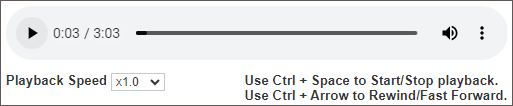
The Play option opens the playback control to allow users to play/pause audio. Users can also play and pause the audio using the Ctrl + Space shortcut, rewind using Ctrl + ←, and fast forward with Ctrl + →. Foot pedals that are capable of being configured to send specific keystrokes can be used to control playback as well. Please refer to your foot pedal manufacturer's user manual for assistance in configuring the shortcuts. Dictations are stored on the eSOne system for 90-days and cannot be played after that time. The Play option will not appear when the dictation is not available.
Printing
Notes print in the order they appear in the grid when using bulk printing. To change the order in which notes are printed, resort the table, then print.
Note
A separate printing component is required to print notes. The user will be prompted to download it if it is not found when printing is initiated. See the Printing Agent User Guide.
Append
Use the Append feature to combine multiple notes for the same patient into a single appended note. The append action must be initiated from a workflow folder or the Search All > Basic Search view. It is not currently available from the Note Editor, Note Viewer, or Note Info pages. You can adjust the order of the notes and manage which ones to include in the chain.
To Append Notes:
-
Navigate to a workflow folder or Search All > Basic Search.
-
If needed, enter search criteria or apply filters to locate at least one note for the append chain.
-
Do one of the following:
- Check the selection box for one or more notes. Expand the Bulk Actions menu.
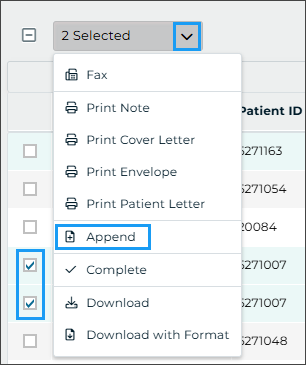
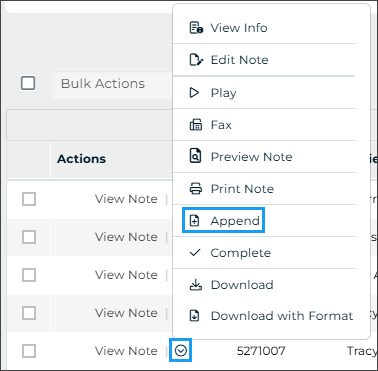
- Or, expand the Actions menu for a single note.
- Check the selection box for one or more notes. Expand the Bulk Actions menu.
-
Click Append to open the append window.
-
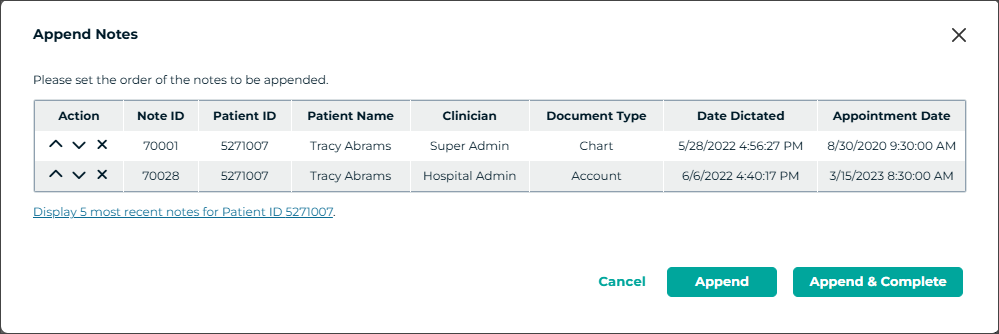
When the append dialog opens, one or two grids will appear depending on how the append action was initiated:
- If two or more notes were selected before clicking Append, a single grid will appear at the top. Below it, you'll see a link labeled Display 5 most recent notes… that can be used to load additional notes for the same patient.
- If only one note was selected, you will see two grids:
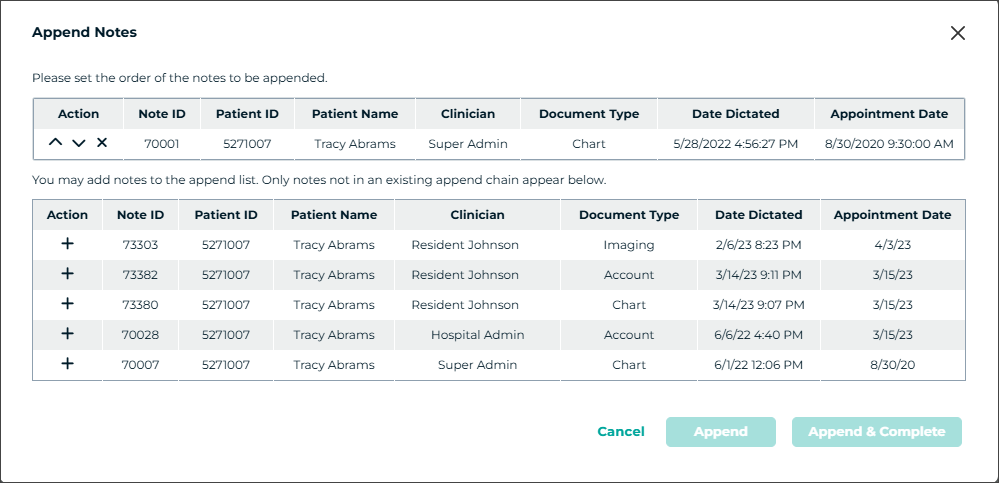
- The top grid shows notes currently in the append chain, listed in the order they will be appended (top to bottom).
- The bottom grid displays additional notes for the same patient that can be added to the chain.
- If two or more notes were selected before clicking Append, a single grid will appear at the top. Below it, you'll see a link labeled Display 5 most recent notes… that can be used to load additional notes for the same patient.
-
To add more notes to the append chain, click the + button next to a note in the bottom grid. The selected note will be added to the end of the top grid.
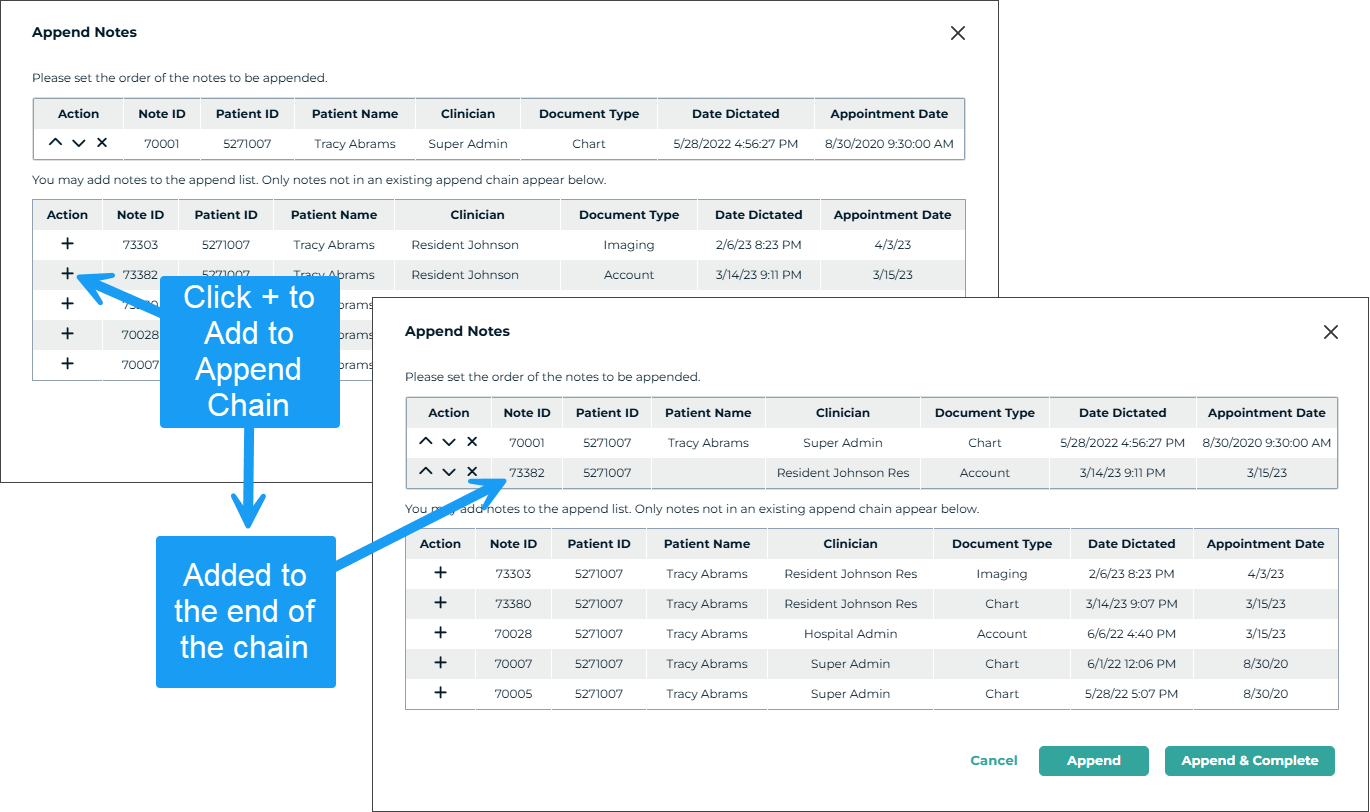
- The top grid displays all notes currently in the append chain, listed in the order they will be appended—first at the top, last at the bottom.
- If the note you need is not visible in the bottom grid, try adding one or more visible notes first. As space becomes available, older eligible notes will automatically load in the bottom grid. After you've added the necessary notes to the top grid, remove any that should not be in the chain by clicking the X next to those notes.
Important
Only notes for the same patient ID that are not already part of another append chain are eligible to be appended together.
-
Use the arrow buttons to reorder notes in the append chain in the top grid.

-
Repeat as needed to add additional notes.
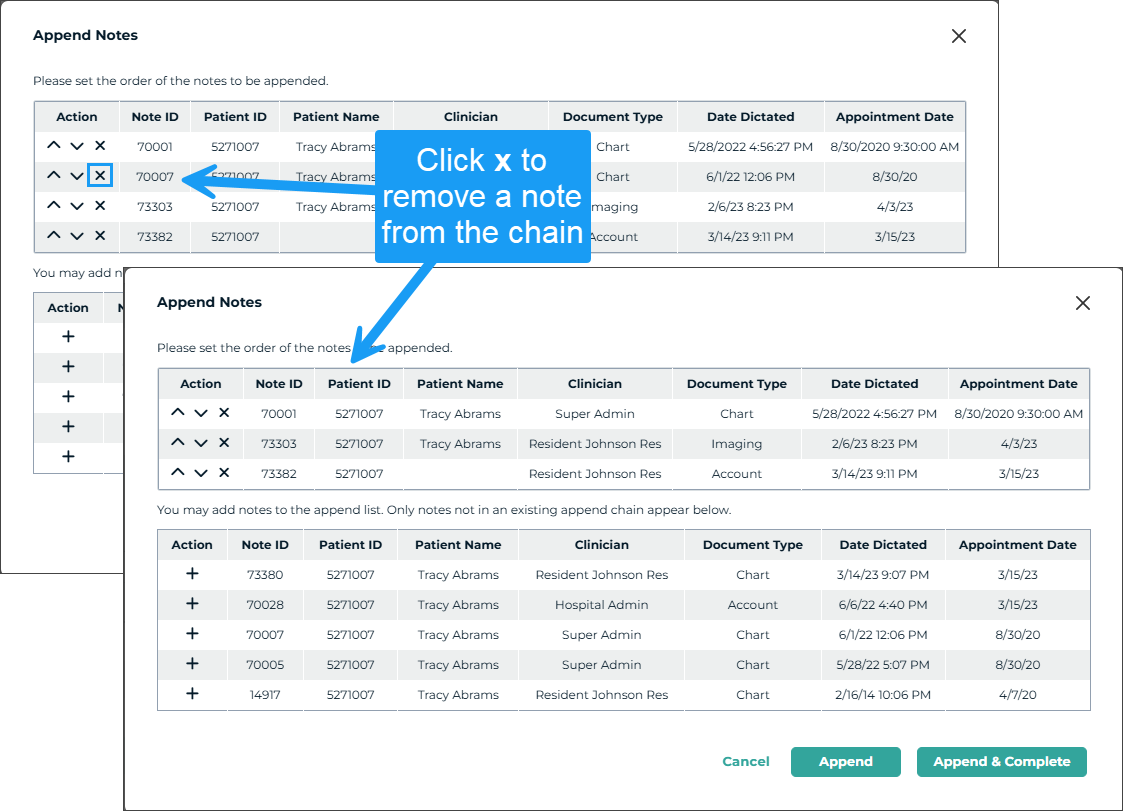
-
To remove a note from the append chain, click the X next to that note.
-
When finished:
- Click Cancel to close the window without saving.
- Click Append to save the chain and leave the notes in their current workflow status.
- Click Append & Complete to save the chain and complete only the appended notes that are in the same workflow folder from which the append was initiated.
- Notes from other folders will remain in their current workflow status.
- If the append is initiated from Search All, the Append & Complete option is not available.
-
If any notes cannot be completed, a message will appear identifying the affected Note ID(s).
- Notes may be blocked from completion due to required attestation templates, proxy or authorization issues, or failed validation rules.
Edit an Existing Append Chain
To edit an existing append chain:
- Select only one note from the append chain before choosing the Append action. Selecting multiple notes will result in a message stating that one or more notes are already part of an append chain.
- From the Actions menu or Bulk Actions menu, choose Append.
- All notes in the append chain will appear in the top grid.
- To remove notes from the chain, click the X next to each note.
- To add new notes, select them from the bottom grid by pressing the + button.
- Click Append to save the updated chain and retain the notes' current workflow status, or click Append & Complete to save and complete only the appended notes that are in the same folder from which the append was initiated.
- A confirmation message will appear indicating the "append" was successful, even if the append chain was cleared entirely.
After notes are appended the text for all notes in the chain will be visible in the note viewer. If a note in an append chain is opened in the editor, only that note will be visible. Other notes in the chain can be edited by clicking on the link in the note viewer or searching for the note in Search All or the workflow folder.
Bulk Actions
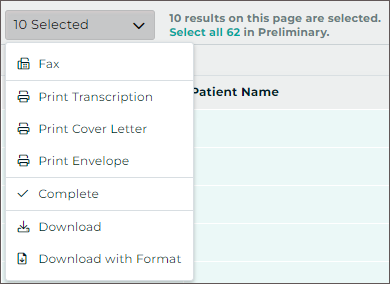 Performing the same action for multiple notes can be achieved by selecting the desired notes with the check box at the beginning of each row, or the select-all box above the grid, then clicking the appropriate action from the bulk action menu. The select-all check-box above the grid will select all notes on the current grid page. To select all notes that meet the applied filter criteria, check the select-all check-box, then click the "Select all" link in the text next to the bulk action menu. Actions chosen from the bulk actions menu will apply to all selected notes.