The Patients Tab

Use the Patients tab to view a list of patient appointments/encounters and create dictations.
By default, this tab is named Patients. The account administrator can change this label to something more appropriate to the client.
The eSOne mobile app supports outpatient and inpatient schedules. By default, the app opens to schedule (outpatient) mode. The mode can be changed in Filters the schedule filters. This section of the user guide will focus on the outpatient schedule mode. See Inpatient Workflow for more information about inpatient mode.
Filter and Sort the Schedule
Filters

To change the schedule mode and filter the schedule, tap ![]() to open the Filters page. Tap the desired mode and/or filter and tap Done at the top of the Filters page to save changes.
to open the Filters page. Tap the desired mode and/or filter and tap Done at the top of the Filters page to save changes.
Mode
If the client supports both inpatient and outpatient workflows, users can switch between them by tapping the desired mode. For more information regarding the inpatient workflow within the mobile app, please see Inpatient Workflow. The following information in this section assumes an outpatient workflow is being used.
Resources
Schedule resources are used to assign patient appointments or encounters to specific clinicians or groups of clinicians. If a clinician belongs to multiple resource groups they can filter their appointment list to only display the selected resources.
Dictation Status
Users can minimize the number of appointments displayed on the schedule by filtering the list based on the dictation status. Statuses available for filtering are:
-
Dictation from another source - appointments with a dictation uploaded from a different mobile device or dictation source (InSync, InTouch, ShadowLink, etc.), or uploaded from this device but no longer stored on this device. Dictations uploaded from other devices or apps cannot be played from this device.
-
Dictation uploading - Dictations in the process of being uploaded to eSOne.
-
Dictation completed - Dictations that have been uploaded to eSOne from this device.
-
Hidden appointments - Appointments that the provider has hidden from the mobile app schedule.
Dictations that have a started (on-hold) dictation cannot be filtered out.
After all sorting and filtering changes have been made, scroll to the top of the page and press Done.
Sorting

To change the sort order of the schedule, tap ![]() to open the sort options. One sort option can be applied to reorder the schedule based on user preference. The schedule can be sorted ascending (oldest to newest dates or A to Z) or descending (newest to oldest or Z to A). Tap the desired sort order (ascending or descending) then tap the sort option to order the schedule based on:
to open the sort options. One sort option can be applied to reorder the schedule based on user preference. The schedule can be sorted ascending (oldest to newest dates or A to Z) or descending (newest to oldest or Z to A). Tap the desired sort order (ascending or descending) then tap the sort option to order the schedule based on:
-
Appointment Time - appointments will be ordered based on the time of the appointment, then by dictation status in the following order: No Dictation, On-hold, Uploading, Completed, Dictation from another device).
-
Patient Full Name - appointments will be ordered alphabetically by the patients' full names (if the first names match then the middle initial and/or last names will be used to further order them).
-
Patient Last Name - appointments will be ordered alphabetically by the patients' last names, but will still appear in "First name Last name" format in the schedule list.
-
Patient First Name - appointments will be ordered alphabetically by the patients' first names.
-
Dictation Status - When sorted ascending, patients will be sorted first by dictation status (Dictation on Hold, Upload Complete, Dictation Not on Device) then by patient name.
Schedule
Patients and appointments will only appear in the Patients tab if the client is providing eSOne a data feed. If a data feed is not provided, users can create new dictations and optionally input patient and appointment data.
The schedule opens to the current date if the schedule was on the previous day's schedule in the prior session. Otherwise, the last date displayed in the schedule will open. Only one day will be displayed in the schedule at a time. To change the date tap on the calendar icon or date to open the date picker, or use the left or right arrows on either side of the date to move to the previous or next day, respectively.
Patient appointments are sorted by appointment time by default. Each appointment is separated by the appointment time, even if multiple patients share the same appointment time.
Each appointment displays the patient's full name, MRN, and a data field. This data field typically contains an appointment description, but depends on the data feed setup. An additional data field can be displayed when selected in the Settings tab.
The schedule will automatically refresh every 5 minutes. To manually refresh, swipe down on the schedule.
Dictation Status
An appointment may have one of several status icons and color coding to indicate the dictation status for that appointment.
![]() The appointment has a dictation that has been started but not yet uploaded.
The appointment has a dictation that has been started but not yet uploaded.
![]() The appointment has a dictation that is currently uploading.
The appointment has a dictation that is currently uploading.
![]() The appointment has a dictation that is currently uploading (longer dictations will show an upload status ring around the upload arrow).
The appointment has a dictation that is currently uploading (longer dictations will show an upload status ring around the upload arrow).
![]() A recorded dictation for this appointment has been successfully uploaded from this device.
A recorded dictation for this appointment has been successfully uploaded from this device.
![]() A dictation that is not on this device has been uploaded for this appointment.
A dictation that is not on this device has been uploaded for this appointment.
Note
An appointment without a dictation file will not have an icon next to it.
Incomplete Dictations
A reminder will be presented the first time the Patients tab is open each day if there is at least one started dictation 3 or more days old (based on the appointment date) that has not yet been uploaded. This reminder will only be presented once per day.

Tap Ignore to continue to the schedule as normal, or tap Show to open the schedule to the date of the oldest started dictation.
Users can also tap the ![]() Earliest Started Dictation button at the top of the schedule list to open the calendar to the earliest date with a started dictation that has not yet been uploaded.
Earliest Started Dictation button at the top of the schedule list to open the calendar to the earliest date with a started dictation that has not yet been uploaded.
Dictating from the Schedule and Search Results
Selecting an appointment from the schedule opens the Record screen with all available patient and appointment details and dictation controls. If the desired patient cannot be easily found in the schedule list or does not appear on the schedule, a patient or appointment search can be performed.
Patient and Appointment Search

Tap the Search button to search for an appointment already on the schedule list or to add the patient/appointment to the schedule that may not have previously appeared.
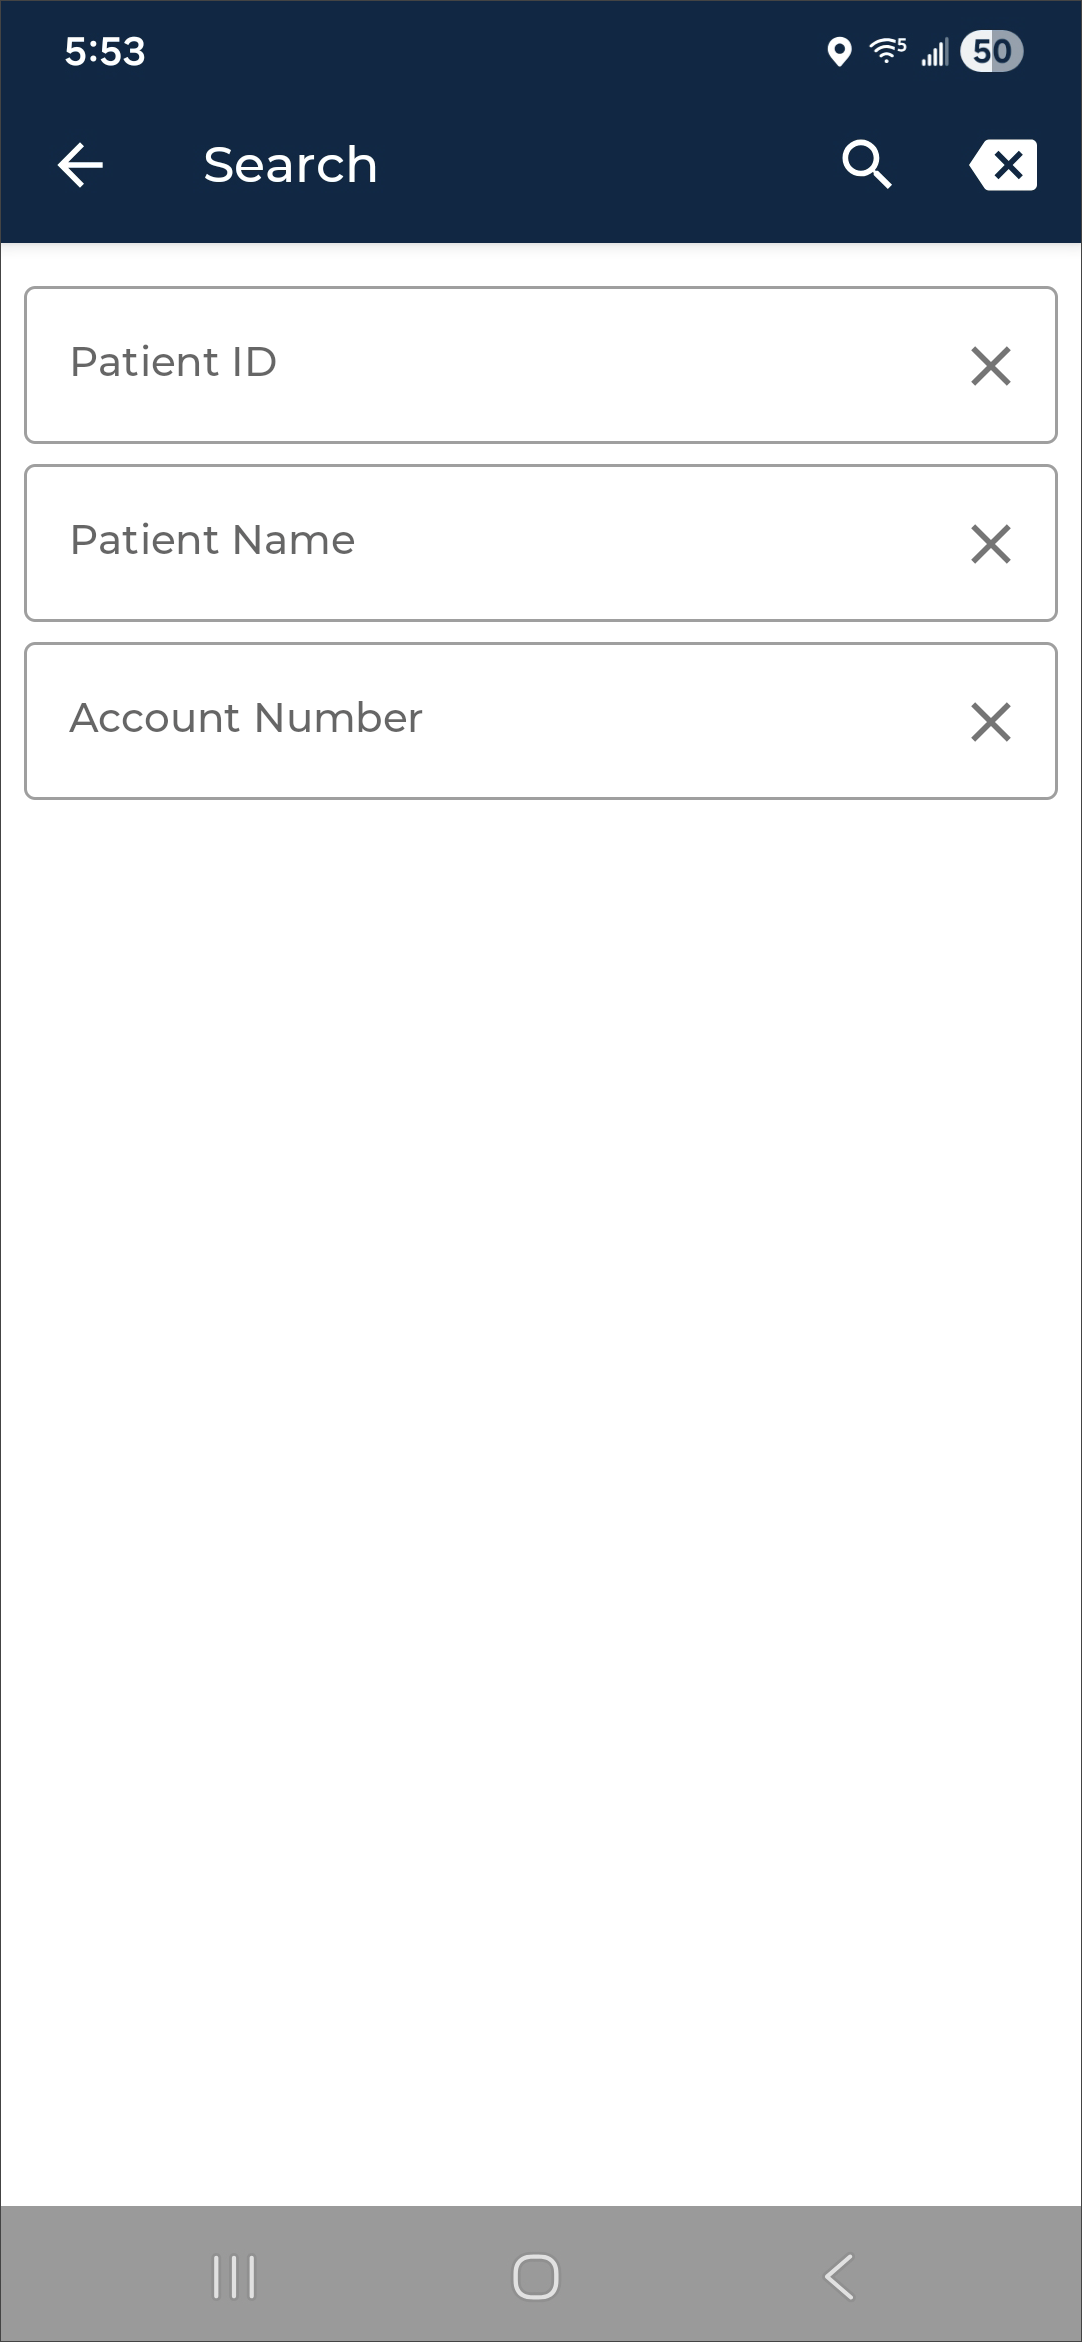
The Search dialog will open and prompt for Patient ID, Patient Name, and/or Account Number. The search field labels are customizable per client and may not match what is shown here. Patient and appointment records can only be searched if eSOne receives a data feed from the client.
Enter one or more search criteria. The Patient ID and Account Number must be full matches and the Patient Name can be a partial match of the first or last name. Tap the search key in the on-screen keyboard or ![]() to submit the search.
to submit the search.

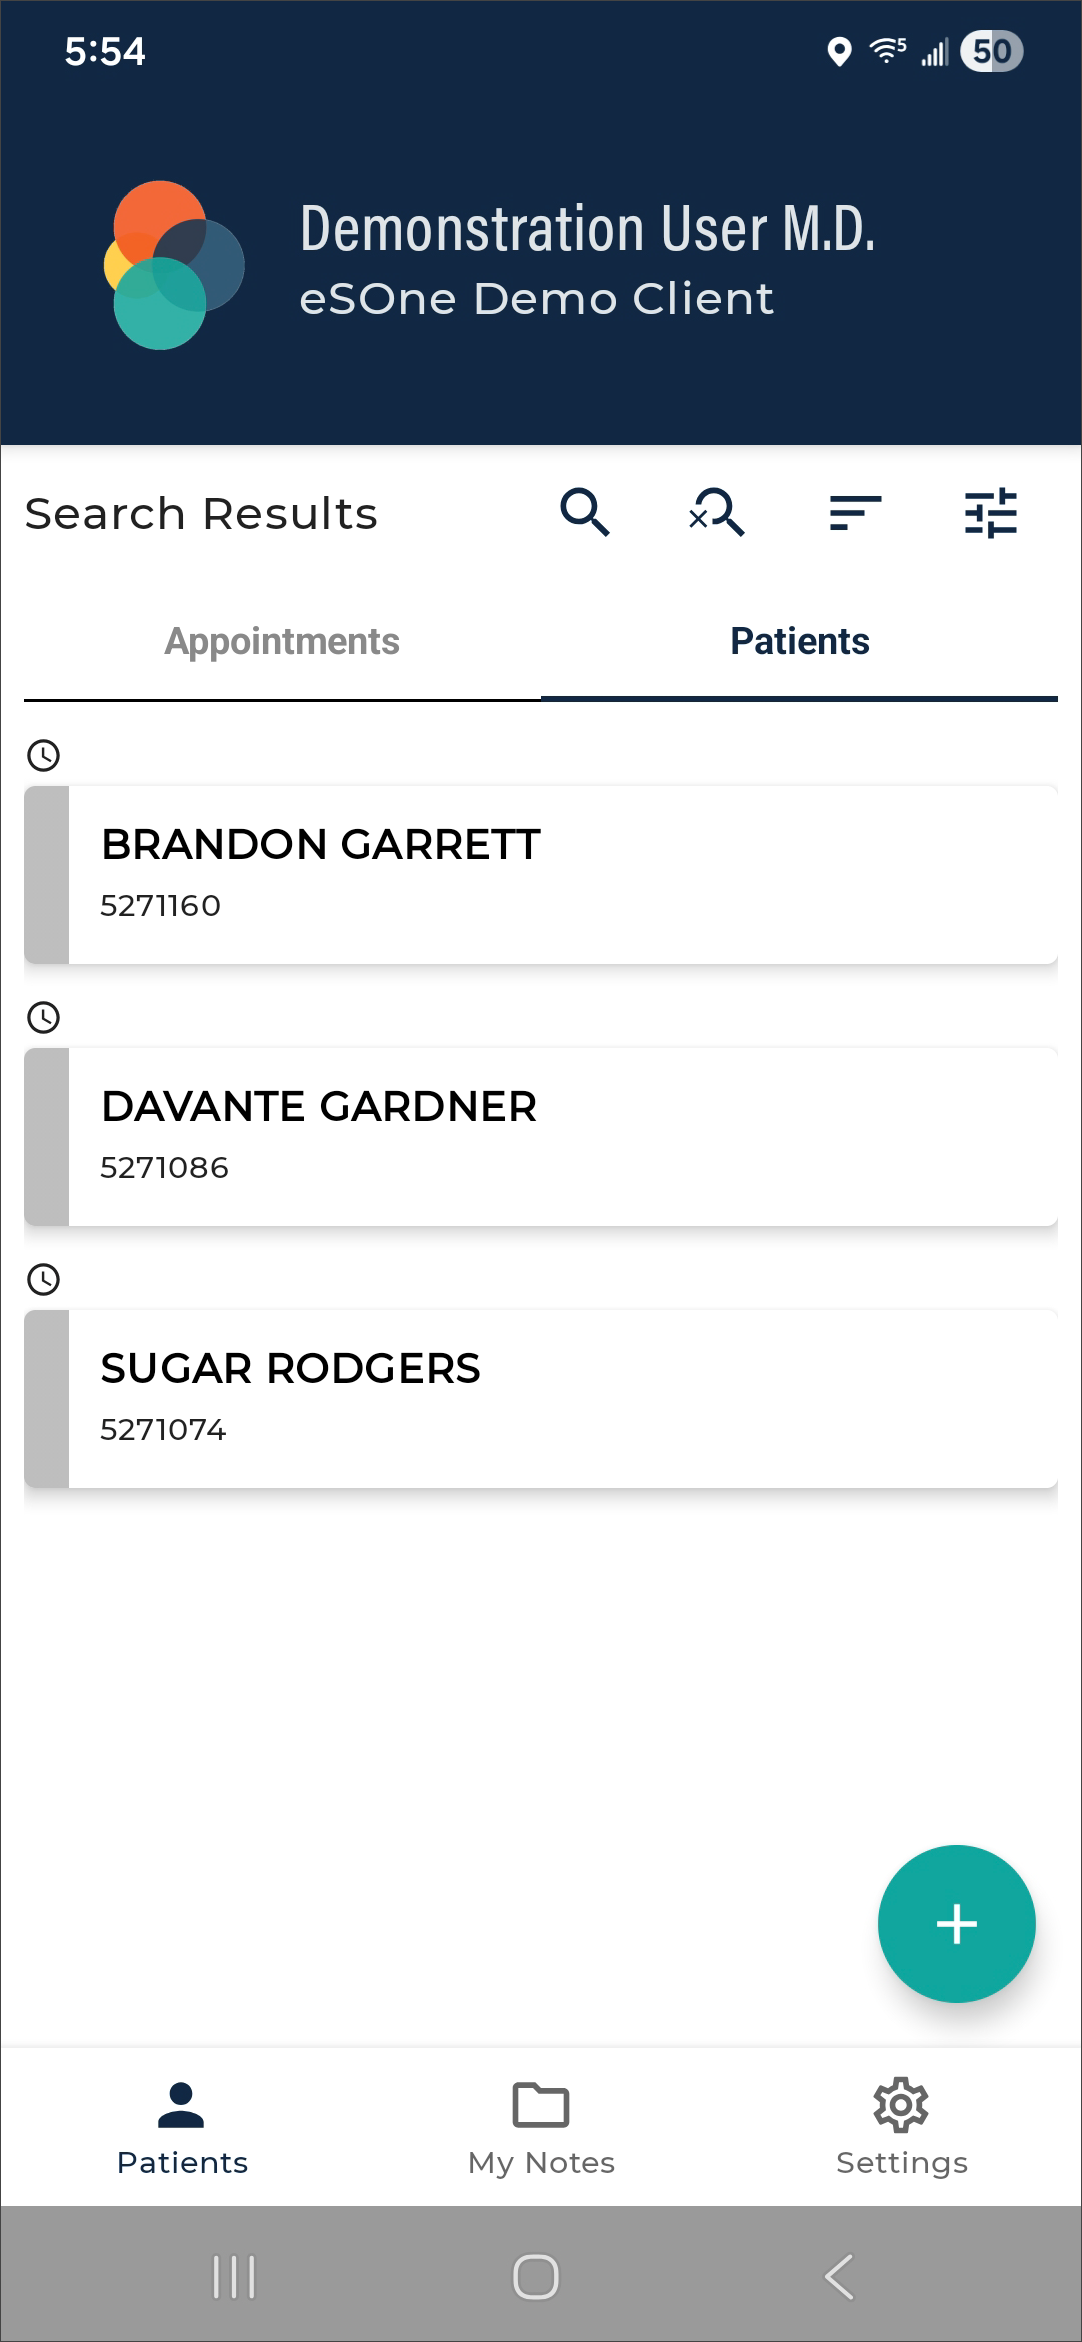
Search results will appear in two tabs: Appointments and Patients. Tap the desired patient or appointment to add the patient/appointment to the schedule and open the record screen.
Choosing an appointment from the Appointments tab will place it on the schedule at the designated date and time, including all associated appointment details. Appointment demographic fields cannot be edited when selecting an appointment from the search results.
Choosing a patient from the Patients tab will add that patient to the schedule, setting the appointment date to the current date and time. The appointment date and time can be changed if needed. Some appointment fields may be editable depending on the configuration of the selected document type.
To return to the schedule without selecting a search result, tap ![]() .
.
Dictating Without an Appointment

![]() To create a new ad-hoc dictation without selecting a scheduled appointment or searching for a patient or appointment, tap the Add button within the Patients tab.
To create a new ad-hoc dictation without selecting a scheduled appointment or searching for a patient or appointment, tap the Add button within the Patients tab.
The configuration of the selected document type determines which patient and appointment fields are visible and editable, as well as which field serves as the patient identifier. Editable fields are indicated by a green border. When a patient identifier (Patient ID, Account Number, or Order Number) is entered and matches an existing patient, their name, ID, gender, age, and DOB will automatically populate in the dark blue header area.
The appointment date defaults to the date loaded in the schedule with the current time stamp. The Document Type and Location are always editable—tap either field to open a selection list. To change the appointment date, tap the Appointment Date field to open the date picker. The Templates tab is available for reference while dictating. The History tab will populate with any prior notes related to the patient.
Note
The process for creating a new dictation for an inpatient encounter is different. Please see Inpatient Workflow for more information.
Record Screen

The Record screen can be accessed from the Patients tab by selecting a patient/appointment or pressing the Add button.
The Record screen opens to the Template sub-tab by default, unless changed in Settings tab > Record Screen. If an appointment that already has an uploaded dictation from the same device is opened, the Record screen will open to the History sub-tab.
The top header section of the Record screen contains basic patient information, including the patient name, MRN, gender, birth date, and age. When a new dictation is created and a patient identifier has not been entered, the header information will display "New dictation" instead of a patient name. The screen has three tabs: Templates, Information, and History.
Templates Tab


The Templates tab displays Document and Dictation templates to be referenced during dictation. To view the full text of a template, tap the arrow to expand the list of available templates then tap the desired template. A document type must be selected in the Info Tab to view the document template.
Info Tab
The Info Tab contains information about the patient and appointment, divided into five sections.
Document Type - Allows user to edit the document type associated with this dictation. Tap on the field and make a selection from the provided list to add or change the document type. This field is highlighted in yellow when a selection has not been made and is required prior to uploading the dictation.
Location - Allows user to edit the location associated with this dictation. The facility scheduling software or EMR can also set the location for an appointment. This location will appear by default but can be changed. Tap on the field and make a selection from the provided list to add or change the location. This field is highlighted in yellow when a selection has not been made and is required prior to uploading the dictation.
Only the document type and location can be edited for dictations created from an appointment in the appointment list.
Tip
Use the Settings screen to set a default document type and location, and to set a list of favorite document types and locations. See Settings tab.
Demographic Information

Displays patient information. The user cannot edit these fields for an existing appointment.
Appointment

Displays any additional information about this appointment. The user can make changes to Appointment Date and Time for new dictations, but not for appointments selected in the Patients tab.
Confirmation Information

Displays the Receipt Code and Note ID for this dictation. If more than one dictation has been uploaded for this appointment on this device, the most recent confirmation information will be displayed. eSOne Mobile fills in the Receipt Code and TID fields after uploading the dictation; these fields cannot be changed by the user.
Orders Tab

For document types that support the orders workflow, orders can be viewed and selected prior to dictation upload. This functionality ensures orders are associated correctly during dictation and reduces the need to attach orders after upload.
The Orders tab displays a list of available orders with the following information for each order:
- Order Number
- Date Observed
- Order Status
- Order Description
- Ordering Physician
Tapping an order opens additional order details for review:
- Item Code
- Account Number
- Order Status

The orders list and details panel have a checkbox. Tapping the checkbox selects or deselects the order for attachment to the dictation. Orders checked (selected) at the time of upload will be associated with the dictation.
Orders may be preselected based on the method used to create the dictation. See Preselected Orders for more information.
Preselected orders can be deselected, and other available orders can be selected as needed prior to upload. Order selections remain editable until the note is uploaded.
Selecting Multiple Orders
Multiple orders can be selected for a single note. The same selection rules apply as in InQuiry:
- Only orders associated with the same appointment can be selected together, or
- Orders that are not linked to an appointment can be selected together
Orders associated with different appointments cannot be selected on the same dictation. If an order from a different appointment is selected, any previously selected orders will be deselected automatically.
Preselected Orders
When dictating on an appointment from the schedule, orders linked to that appointment will be preselected automatically.
Orders can also be accessed when working outside the schedule, but the available orders and pre-selection will be determined by the method used to create the dictation:
- A patient is selected from the Patients sub-tab after performing a search.
- All orders linked to the patient will be listed.
- No orders will be preselected.
- An appointment is selected from the Appointments sub-tab after performing a search.
- All orders linked to the same appointment or not linked to an appointment will be listed.
- Orders linked to the selected appointment will be preselected.
- An ad-hoc dictation is created using the Add button.
- All orders linked to the patient will be listed.
- The orders preselected will depend on the patient identifier entered (Patient ID, Account Number, or Order Number, depending on document type configuration).
- Patient ID - No orders will be preselected.
- Account Number - All orders linked to the appointment associated with the Account Number will be preselected.
- Order Number - The order matching the entered Order Number will be preselected.
Finalize the order selection by checking the boxes to attach orders or unchecking them to exclude orders.
Viewing Orders After Upload

After uploading the dictation, upon reopening the dictation from the schedule, the Orders tab displays the orders that were selected at the time of upload. Orders cannot be modified after upload.
The History Tab
Tap the History tab to display existing notes that have the same Patient ID as the current patient. These notes are available for reference while dictating, but cannot be edited from this screen.


Prior notes are identified by document type, dictating clinician, and appointment date. Tap the desired appointment to view details, which are broken into the following sections:
-
Note - Displays the note text.
-
Demographic Information - Displays patient information.
-
Appointment - Displays appointment details, including document type and location.
-
Dictation Information - Displays Note ID, Date Dictated, and the Clinician.
-
Signatures - Lists signatures on the note and date signed (no date appears if the note has not yet been signed).
-
Associates - Lists all copied associates on the note.
-
Comments - Displays comments and comment tags on the note, if the user is granted permission to view comments.
To return to the list of prior notes, tap the back arrow in the upper left corner of the screen, or the back button on the Android device.
Recording Controls

The recording and audio controls appear at the bottom of the Record screen of all three tabs. There is a progress bar and buttons for Record, Play, Rewind, and Fast Forward. Tap the Record button (red microphone) to begin recording; the record button will then become a Pause button. Tap the Pause button to pause recording; recording can be resumed by tapping the record button again.
When multiple recording devices are connected the selected device is displayed at the bottom of the screen. The recording device can be changed by tapping the device name to open the list of connected devices, then tap the desired device. The selected device will be remembered as the preferred device and will be used for subsequent dictations, if still connected. If the connection to the selected recording device is lost during dictation, recording will automatically pause and a notification will be displayed. Close the notification, verify the desired device is selected, then press Record to resume dictating.
Tap the Play button to play back the dictation. Use the Rewind and Fast Forward buttons to navigate within the location of the dictation in increments of 5 seconds per button press. Alternatively, the dictation slider can be used to navigate to the desired dictation location.
Underneath the Record button, the Progress Bar shows which part of the dictation is currently playing or being recorded. The slider can be dragged to play different parts of the dictation or to insert or overwrite the dictation where desired.

To the left of the record button is the STAT button. The STAT indicator can be toggled on and off at any time prior to uploading the dictation. If the STAT radio button is black-filled, the dictation is marked STAT.
Note
Marking a dictation as STAT may increase the price for the note. Please contact your transcription company for more information.

The current Record Mode is displayed to the right of the record button. Tapping the record mode opens a menu and allows the mode to be changed to one of the following options:
- Append (the default mode) - Adds new dictation at the end of the existing dictation regardless of where the dictation playback is.
- Overwrite - Allows the user to replace dictation from the selected playback position with new dictation.
- Insert - Adds additional dictation by inserting new dictation at the playback position.
Recording must be paused to change the record mode. The last used recording mode will be automatically applied to the following dictation.

The Voice Detection bar replaces the progress bar while recording, showing the level of sound detected. The higher the volume of the dictation received, the further the colors progress from red to green. The Silence Detection option can be enabled in the Settings tab; recording will automatically be paused if continuous silence is detected for the set number of seconds while recording.

The Upload button submits a dictation for transcription. Uploaded dictations cannot be edited in the eSOne mobile app. This button only appears after a dictation has been started.
The back arrow, located in the top left corner of the record screen, allows the user to Save the dictation and return to the Patients tab without uploading the dictation. The Android device's back arrow also saves dictations. Saved dictations can be reopened, changed, and uploaded. If the user leaves dictations on the device for longer than three days without uploading, eSOne Mobile displays a reminder.
Menu Button
The Menu button appears in the upper right corner after recording has started. Tapping the Menu button opens a menu with the following option:

Delete Audio: Deletes the dictation file. eSOne Mobile displays a warning screen to confirm removal of the dictation. Note that only pending dictations can be deleted. Uploaded dictations will be automatically removed 14 days after upload.
An appointment from an uploaded schedule will remain on the Patients tab after audio has been automatically removed. Deleting audio on a new dictation removes the appointment from the schedule.

New Dictation: If it is necessary to create an additional note for an appointment, return to the Patients tab and select the appointment.
Press the Menu button and select 'New Dictation'. Select Document Type and Location, then record normally.
Press the Upload button and eSOne Mobile will prompt for the dictation type:
-
Append: Attach this note to the end of the prior note.
-
Prepend: Attach the new note to the beginning of the prior note.
-
Upload as New Dictation: Upload this dictation as a standalone note. This note will not be attached to any prior notes.
Note
The options available from the Menu button may change depending on the status of the dictation.
Uploading Dictations
Once a dictation is recorded, it must be uploaded to be processed. To upload a dictation, ensure the device has a stable internet or Wi-Fi connection and tap the ![]() Upload button.
Upload button.
If the network or Wi-Fi connection is lost during the upload process, the upload will pause automatically. Once the connection is restored, the upload will resume from where it left off, ensuring the dictation is successfully delivered without requiring any manual intervention.
For best results, it is recommended to upload dictations when connected to a reliable Wi-Fi network to prevent interruptions and ensure timely processing.