My Notes Tab
 My Notes tab provides a view similar to the workflow summary in InQuiry. Use this tab to review, complete, or edit notes.
The main notes screen gives an overview of how many notes appear in each workflow folder. The workflow folders display the label name assigned by your medical facility. The first folder, here called "To Be Typed", contains dictations that are at the note company, but have not yet been delivered as a note.
Use the Search button in the upper right corner of the main notes screen to search for notes in any workflow folder, including notes that have completed the workflow. Tap the back arrow to return to the main notes screen. See Note Search below for more details on performing a note search.
The Folder View
 Tap on any of the folders on the main notes screen to show a list of the notes that are currently in that stage of the workflow. The workflow folder name is displayed at the top of the screen. To return to the summary list of all workflow folders, tap on the back arrow or name of the current folder.
When a workflow folder is opened, the patient name, patient ID, appointment date and time, and dictating clinician’s name are shown for each note in that folder. An additional user field can be added to the folder view from the Settings Tab. If a patient has not been added to a note, the patient name field will display as "No Patient"; if a patient ID has been entered without a linked patient name, the patient name will display as "No Patient Name".
The list of notes can be sorted by Date Dictated, Patient Name, or Appointment Date by pressing the Filter button and making a selection.
Comments and Comment Tags
Comments and Comment Tags are messages that can be placed on a note. Comments are free-form text, whereas Comment Tags are predefined notes. Notes with Comments and/or Comment Tags will display an icon on the right side of the note.
The following icons are used to indicate which type of comment or tag is on the note:
![]() The note has Comments only.
The note has Comments only.
![]() The note has Comments and one Comment Tag.
The note has Comments and one Comment Tag.
![]() The note has one Comment Tag and no Comments.
The note has one Comment Tag and no Comments.
![]() The note has multiple Comment Tags and no Comments.
The note has multiple Comment Tags and no Comments.
![]() The note has multiple Comment Tags and Comments.
The note has multiple Comment Tags and Comments.
If the medical facility has assigned colors to comment tags, those colors appear on the left tab of the note, as well as in the comment icon. Instead of reading the tags, users can simply look at these visual cues and know which tags have been assigned. If multiple comment tags are on the note, the note and icon will be multi-colored.
Comments and Comment Tags cannot be read from the folder view. Open the note viewer to read the comments/tags. Note Comments and Comment Tags can be read in the mobile app, but not edited. Please use InQuiry if edits are needed on those items.
Completing Notes from the Folder View
 Completing a note from a workflow folder progresses it to the next stage of the workflow. When a note is completed from the Preliminary folder it is considered signed. Notes being completed from the final stage of the workflow will be saved in the repository.
Notes can be completed as a group or individually from the folder view to advance to the next stage of the workflow (if allowed by the medical facility).
To complete all notes in the folder, long-press a note until the Menu button appears in the upper right corner. Tap the Menu button then select Complete All. At least one note must be selected for the Menu button to appear; when Complete All is tapped, all notes will be completed, not just the selected notes.
If a note search is performed prior to using Complete All, only the notes in the search results will be completed from the workflow folder. Other jobs that are in the folder but did not appear in the search results will remain in the workflow folder.
 To complete only selected notes, long-press each note to be completed until a check mark appears on the left tab of the note. Tap the Menu button in the upper right corner of the screen (this button will not appear until at least one note has been selected) then tap Complete Selected.
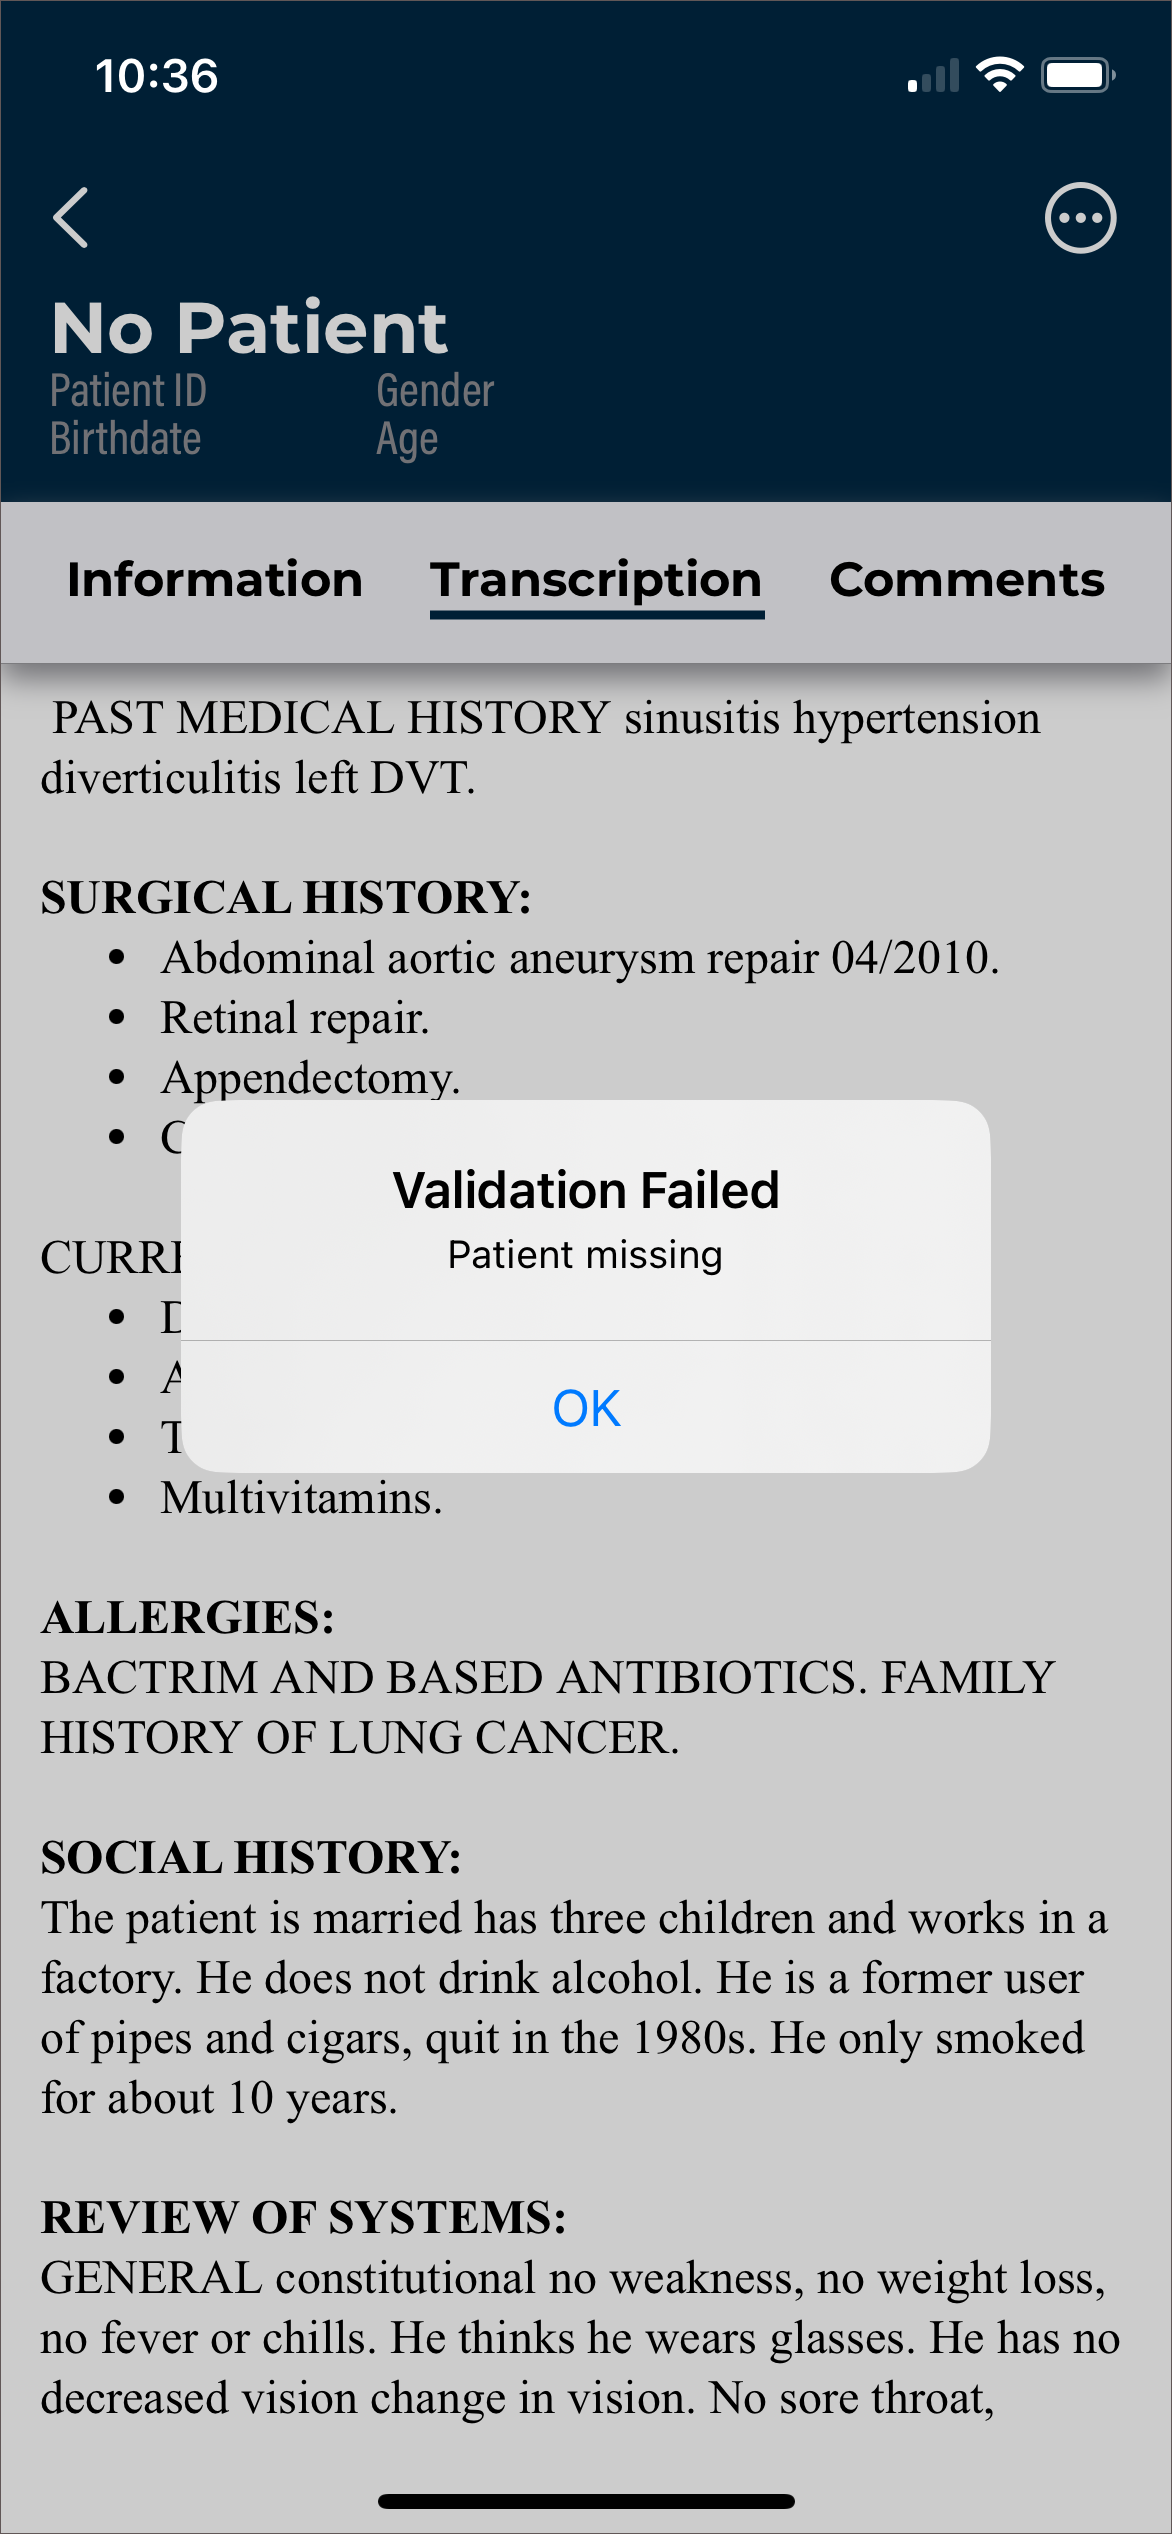
Depending on the setup of the medical facility, some notes cannot be completed with Complete All/Selected, such as jobs with incomplete fields in the note text, failed validation rules, or those requiring an attestation statement. In this case, a message will be presented to the user stating how many notes could not be completed. Those notes will remain in the workflow folder and will need to be completed from the note viewer, while the other notes will proceed through the workflow.
The completion of a note cannot be undone. The Complete All/Selected options will be available to you based on the settings of your facility and user account. eSOne Mobile will present a confirmation prompt before completing the notes with Complete All/Selected; this prompt cannot be disabled.
Note Search
Note searches can be performed within a specific workflow folder or across all workflow stages and can be based on a number of criteria.
Use the Search button in the upper right corner of the main Notes screen to search for notes in any workflow folder (except Referral), including notes that have completed the workflow. This is known as Search All. Select or type in the desired search parameters, then tap the Search button to run the search. A list of results will appear. To return to the main Notes screen, tap the back arrow.
If a note is in the Marked for Review and Marked for Review 2 folders or Final and Final 2 folders it will appear in the search results twice.


The Search All results will each have an icon on the left side that represents where the job is in the workflow:
![]() Dictation Status - The dictation is still being typed by the transcription company.
Dictation Status - The dictation is still being typed by the transcription company.
![]() Marked for Review/Marked for Review 2 - The note has been delivered to the medical facility and is in one or both Review folders.
Marked for Review/Marked for Review 2 - The note has been delivered to the medical facility and is in one or both Review folders.
![]() Preliminary - The note is ready for clinician review and signature.
Preliminary - The note is ready for clinician review and signature.
![]() Final/Final 2 - The note has been signed and is in one or both Final folders for additional processing (printing, faxing, etc.)
Final/Final 2 - The note has been signed and is in one or both Final folders for additional processing (printing, faxing, etc.)
![]() Repository - The note has completed the workflow. This is also known as Search All. The Folder field in the Information tab will be blank.
Repository - The note has completed the workflow. This is also known as Search All. The Folder field in the Information tab will be blank.
Note
The facility can customize the workflow and may not use all of the above folders.
To search only a specific workflow folder, tap the desired folder from the main Notes screen, then tap the Search button. Select or type in the desired search parameters, then tap the Search button to run the search. A list of results will appear.
Search results can be sorted by Date Dictated, Patient Name, or Appointment Date, by tapping the Filter button.
Tap an item from the search results list to view the note details and text.
Tap the back arrow to return to the workflow folder view without the search criteria applied.
Note Viewer
Tap on one of the entries in any workflow folder or search results to view the note text and details. The Patient Name, Patient ID, Gender, Date of Birth, and Age are displayed in the top. Tap the back arrow above the patient name to return to the folder view or search results. The Action Menu button appears in the upper right corner.
Recorded dictations are stored on the phone for two weeks after the dictated date, but they cannot be listened to from the note viewer. To listen to a recorded dictation that is still saved on the device, go to its entry in the Patients tab.
The Note Viewer has three tabs: Information, Note, and Comments. Tap on the desired tab to open it, or swipe left or right to switch tabs. The Note Viewer opens to the Notes tab by default. The tab that is being displayed is underlined.
Information Tab
 The Information tab contains header information about the note and is broken into sections, similar to the Information tab on the Recording screen.
Please note that eSOne’s Patient Display functionality has been extended within the mobile app to the information sections of a note. Patient Displays allow administrators to customize which fields are displayed based on a note’s selected document type.
If configured, users will see different displays when viewing the information sections of a note.
If a document type includes read-only fields, these fields will appear on the screen in a light gray color and cannot be edited. The app will also check for required fields when saving or completing notes. If one or more required fields is not filled out, a message appears indicating which ones. Names of required fields appear in red text.
At this time, Patient Displays only support the required fields setting for user fields.
Note
Please be aware that certain fields will always appear regardless of the document type, and some newer fields are not currently available for the mobile app and will not display.
Default fields:
-
Document Type - Displays the document type of the note.
-
Location - Displays the location of the appointment for the note.
-
Demographic Information - Displays patient name, MRN, birth date, age, and gender.
-
Appointment - Displays details related to the appointment, including the appointment date.
-
Dictation Information - Displays the workflow folder the note is currently in, note ID (formerly known as "Transcription ID"), date dictated, and the dictating clinician.
-
Signatures - Lists all clinicians who will sign the note. The date signed will appear next to or below the signing clinician's name after it has been signed.
-
Associates - Lists all associates to receive a copy of the note.
Note Tab
 The Note tab within the Note Viewer displays the text of the note.
Comments Tab
 The Comments tab displays comments and comment tags on the note. The Comments tab will not appear if the managing transcription company or facility has not granted access to the user.
A red dot will appear on the Comments tab if the note has at least one comment or comment tag.
Action Menu

Tap the Action Menu button in the upper right corner to create a new dictation, edit, or complete a note.
New Dictation

Tap the Menu button then New Dictation to start a new dictation with the same demographic information as the original document. The Recording screen will open with the patient and demographics populated. The appointment date can be changed. Record the dictation as normal (see The Record Screen).
When the new dictation is uploaded, a prompt will be presented to determine how or if the new dictation should be linked to the original note. The options are:
-
Append to Dictation - The note text from the new dictation will be added to the end of the original note.
-
Prepend to Dictation - The note from the new dictation will be inserted before the original note text.
-
Upload as a New Dictation - The note text from the new dictation will not be linked to the note text from the original note; they will both appear as separate notes.
The new dictation will create a separate note and note ID when appended or prepended, but will be linked to the original note. The two notes will appear as one when viewed (after the new dictation has been typed and delivered by the transcription company).
Edit

The note text and demographics can be edited to correct mistakes or add additional information. By default, only documents that are in the Marked for Review and Preliminary Folders can be edited. The Edit option in the eSOne mobile app is intended for small or minor edits. If more extensive editing and formatting is needed, consider using InQuiry on a desktop computer.
To access the Edit screen, tap the Action Menu button at the top right corner of the note viewer, then choose Edit. The top header area will become orange and the note text and demographic fields will be editable.
To edit demographic fields, tap the Information tab while in edit mode. Tap on the field to open the keyboard or selection list, depending on the field type selected. The signatures, associates, comments, and comment tags cannot be edited in the eSOne mobile app; please use InQuiry to make those changes.
 To edit the note text, tap the Note tab while in edit mode, then tap the note text to position the cursor and open the keyboard. A blinking cursor will mark the cursor position.
Tap the Action Menu then Undo Changes to cancel all unsaved changes made to the demographics and note text and return to the note viewer.
Switching between the Information and Note tabs in edit mode will not lose unsaved changes to either tab, but it is recommended to save often.
Use Save in the Action Menu to save changes to the demographics and note text and return to the note viewer. Tapping Complete in the Action Menu while editing will save changes and complete the job from the workflow folder.
If navigation back to the workflow folder is attempted prior to saving changes, a confirmation dialog box will be presented with the options to Cancel or Discard. To return to the editor to make additional changes and/or save changes, tap Cancel. To return to the workflow folder list without saving changes, tap Discard.
Note
Changes are not saved automatically.
Complete

Tap the Action Menu then Complete to progress the note to the next stage of the workflow. When the document is Completed from the Preliminary folder by the dictating clinician or additional authenticator, the electronic signature is also applied, if the provider is using that feature. When the document is completed from the final workflow folder, the note will be saved in the repository (also known as Search All).
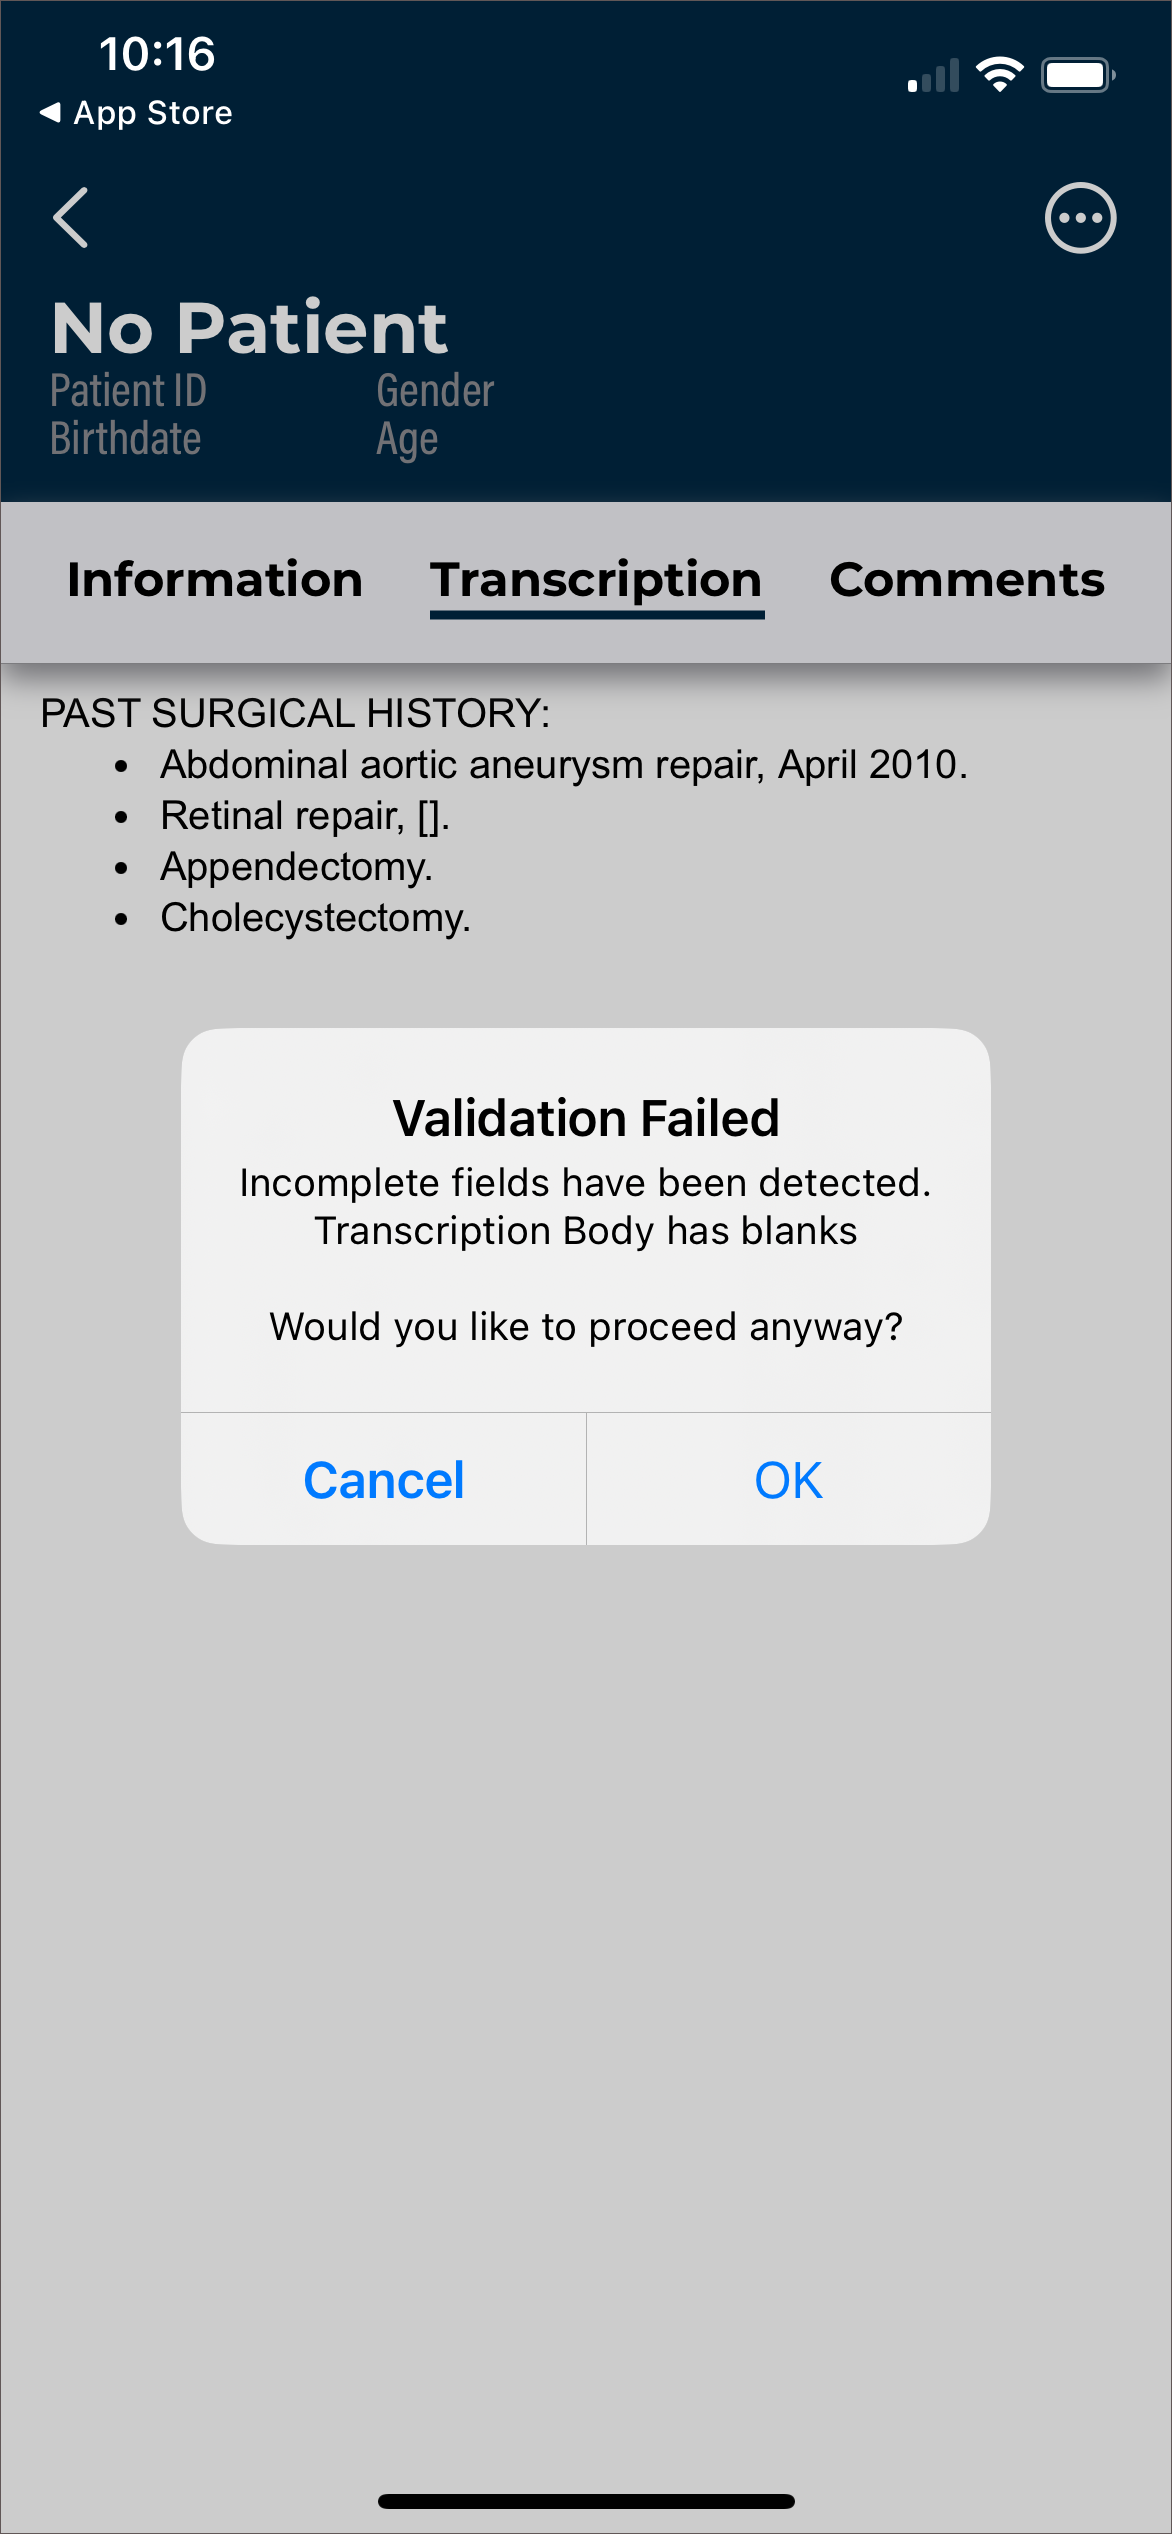
When the note cannot be completed due to incomplete fields within the note text, a notification will appear. The Complete action will be canceled. The user can then enter edit mode to make the necessary edits, then complete the note.
If the client is using workflow validation rules and the job fails validation, a message will appear upon completion, stating which validation rule failed. Depending on the setup of the validation rule, a warning may be given, which allows the user to cancel the complete action to edit the note or continue with the complete action and leave the note as-is; if the validation rule prevents completion the user must edit the note to meet validation requirements, unless the user has the rights to override the prevention.

The completion of a note cannot be undone. By default, eSOne Mobile will present a confirmation prompt before completing the note. This prompt can be disabled in the Settings tab.
Complete with Attestation
If the medical facility requires attestation statements from attending physicians (authenticators) signing notes, the Complete action becomes Complete with attestation in the Action Menu.
After tapping Complete with attestation, the Attestation editor opens. The last used attestation template will automatically load. To change to a different template, tap Templates in the bottom left corner or Load Template from the Action Menu in the upper right corner. A list of available attestation templates will be presented. Tap on the desired template to load it. If edits need to be made to the attestation text, tap within the text to position the cursor and open the keyboard.
To delete all attestation text tap Remove Attestation. The attestation text can then be manually typed in by tapping in the white editor area, or a template can be selected again.
After the attestation text has been finalized, tap the Action Menu then Complete to apply the attestation template and signature and advance the note in the workflow.
Cancel
The Cancel button in the Action Menu closes the Action Menu without taking any action.
Dual Resident Attending Workflow
If the facility uses the dual resident/attending workflow, attending physicians (authenticators) will be allowed to complete documents in the workflow even if the dictating resident has not yet reviewed or approved the document. With this option, documentation can be completed more quickly if needed.
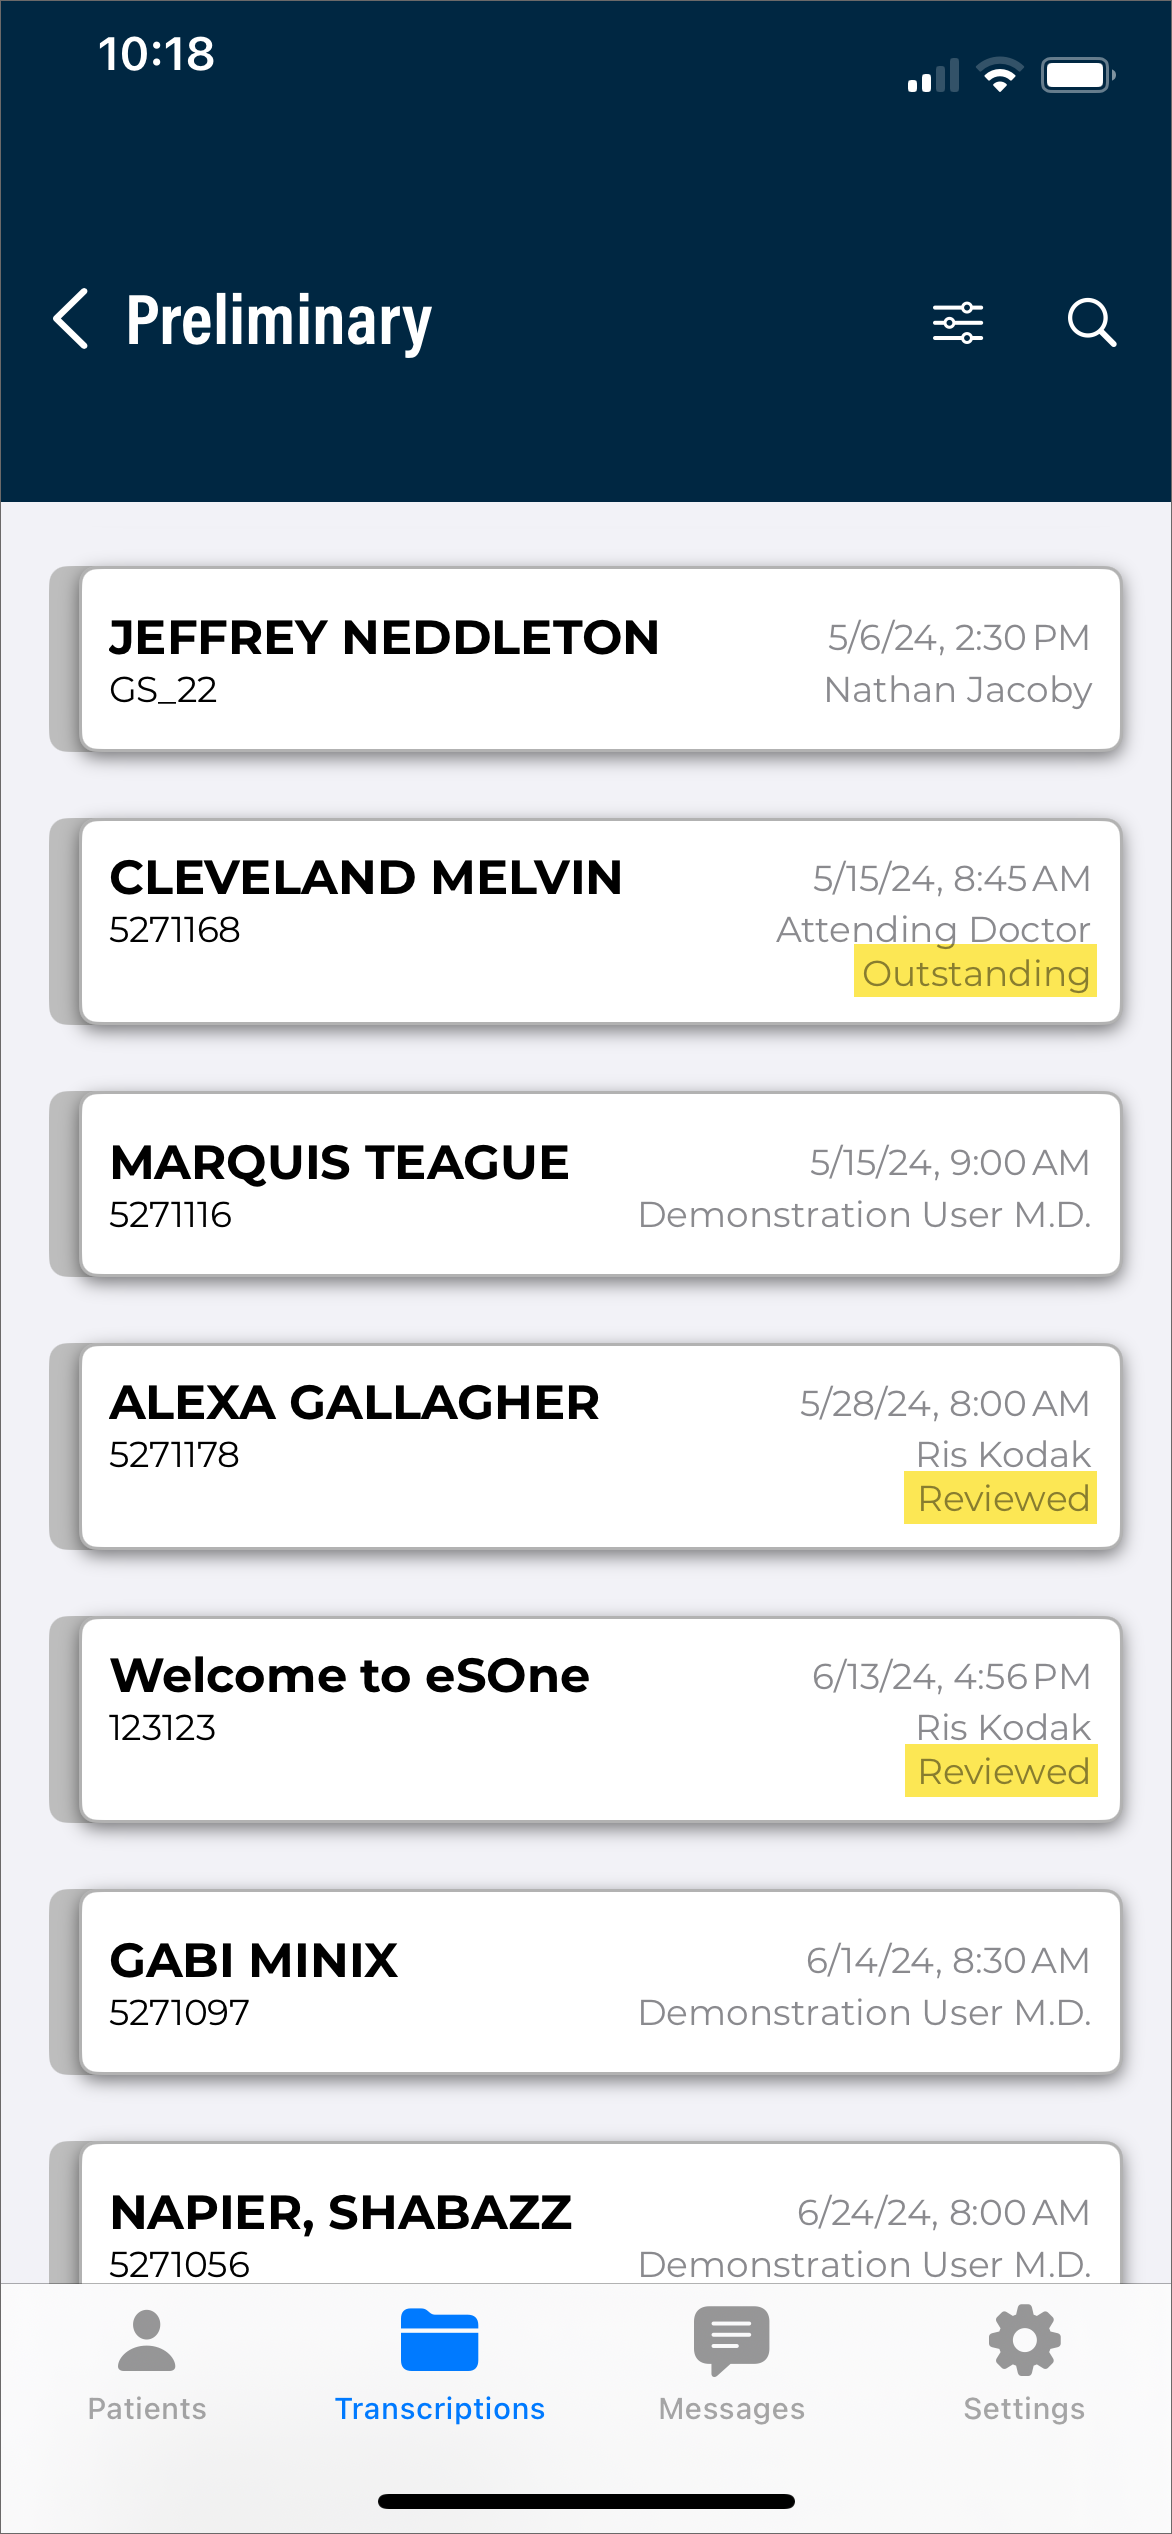 In this workflow, a note requiring an extra signature(s) will appear in the resident's and attending's Preliminary folders at the same time. Either the dictating resident or attending physician can review and edit the document (provided they have proper rights to location and document type). A review status will appear in the note list of the Preliminary folder to indicate if the job has been reviewed by the dictating resident, as shown highlighted in the image. Notes not requiring an additional signature will not display a status.
There are two paths this workflow can follow:
-
Resident reviews/approves an outstanding note, then the attending completes.
- The resident can see the note in the Preliminary folder with an "Outstanding" status and can review and approve the note. After the resident completes the job, it is removed from their Preliminary folder.
- The attending will see the "Reviewed" status from the Preliminary note list and can complete the note. It will move on to the next workflow folder.
-
Attending Completes an Unreviewed Note
- The attending will see the note in the Preliminary folder with an "Outstanding" status prior to the resident reviewing/approving the note.
- Once the attending completes the job, the note moves on in the workflow and out of their Preliminary folders. The next time the resident searches or refreshes their Preliminary folder, the note will not be available.
If the facility does not use the dual resident/attending workflow, notes will not appear in the attending physician's (authenticator) Preliminary folder until after the dictating resident has approved the note and the review status will not appear.