The Settings Tab

Use the Settings tab to set default screens and behavior for the eSOne Mobile application.
Tap the Log out button in the upper right corner or the bottom of the Settings tab to log out of the eSOne app entirely.
Support
- User Guide - Contains a link to the online user documentation. Click ‘User Guide’ to open the documentation in a browser window.
Note
If an organization does not allow users to remain logged in when they navigate away from the app, those users will need to log in again after viewing the guide.
-
Help Desk Support - Contains contact details for support, along with the version number of the mobile app. The Upload Database feature should only be used when directed to by support staff.
-
Change Password - If the password does not meet the password requirements set for the client, the screen will display which ones have not been met after the user presses the Change button. Remember that InQuiry, InSync, and eSOne Mobile all use the same password.
-
Contact Information - Change and verify the user's email address. After the address is changed an email will be sent to verify the new email address. Follow the instructions in the email to complete the verification process. Tap the Resend button to resend the verification email; this button will only appear when the email address is in an unverified state. If the user does not have a verified email address the Settings tab will have a red dot and "Email is not verified" will appear next to the Contact Information menu option.
Defaults
-
Recording Screen - Choose which tab is selected when opening a patient appointment: Templates, Information, or History. Template is selected by default until changed here. Jobs will open to the History tab if there is an uploaded dictation from the same device.
-
Document Type - Select a default document type to be preselected on the record screen. The document type can be changed on each dictation if needed. If "Prompt on Upload" is selected, eSOne Mobile will prompt you to select a document type when uploading a dictation that does not have one selected. "Prompt on Upload" is the default setting.

-
Location - Select a default Location for all dictations. The Location can be changed on each dictation if needed. If "Prompt on Upload" is selected, eSOne Mobile will prompt you to select a Location when uploading a dictation that does not have one selected. "Prompt on Upload" is the default setting.
-
Silence Detection - Select the length of time silence can be recorded before eSOne Mobile pauses the recording. The default value is "30 Seconds" and recording will automatically pause when 30 consecutive seconds of silence is detected.
-
Custom Encounter Field - Select an additional data field to be displayed to the right of the patient name on the appointment listing.
Favorites

-
Document Types - Filter the document types that are available when choosing a document type for a dictation. If a facility has thirty document types, but a dictator only needs five of those document types, this setting is used to remove the other twenty-five from the list of document types. Tap the document name to toggle the favorite setting on (yellow star) and off (white star).
-
Locations - Filter the locations that are available when choosing a location for a dictation. If a facility has fifteen locations and a dictator only works at three of them, this setting is used to remove the other twelve from the list of possible locations. Tap the location name to toggle the favorite setting on (yellow star) and off (white star).
Confirmations
- Confirm Uploads and Confirm Log out - Turn the confirmation pop-up for those actions on or off.
Security
-
Save Login - Save the username to avoid having to enter it at each log in.
-
Save Password - Save the password to avoid having to enter it at each log in. This option will be disabled if the client does not allow password saving.
-
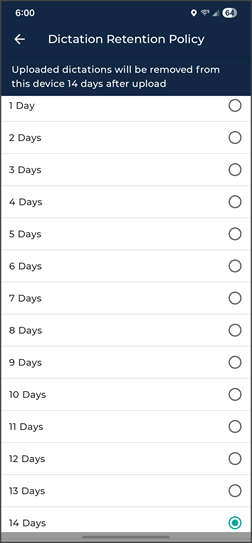
Dictation Retention Policy - Allows you to control how long uploaded dictations are stored locally on your device before they are automatically removed. You can choose a retention period between 1 and 14 days, with a default of 14 days. Dictations remain encrypted while stored on the device and are removed automatically when the retention period expires. Dictation removal is calculated based on the date the dictation is uploaded, plus the selected retention period. This applies to both inpatient and outpatient encounters.
Warning
When Save Password is enabled, anyone with access to the device can access the eSOne account and the confidential medical records in it.
Accounts
 eSOne Mobile can access user accounts across multiple medical facilities by linking accounts. The Accounts list includes all Linked accounts and allows the user to quickly switch between user profiles.
Tap Add Account to link a new user account. eSOne Mobile will prompt for the username, password and client for the initial setup. The new linked account will appear in the Accounts list with the full client name, followed by the user's first and last name.
To switch to a linked account, tap on the desired account profile; the password is required unless the medical facility has enabled password saving. A black radio button indicates the current logged-in account. Patients and transcriptions in those respective tabs will now show data for the current logged-in account only.
To remove a linked account, tap the X button next to the user account to be deleted.