Patients
The Patients tab provides a daily view of patient appointments and the option to record dictations for appointments directly from InQuiry. The schedule view is only available to clients who provide an appointment data feed.
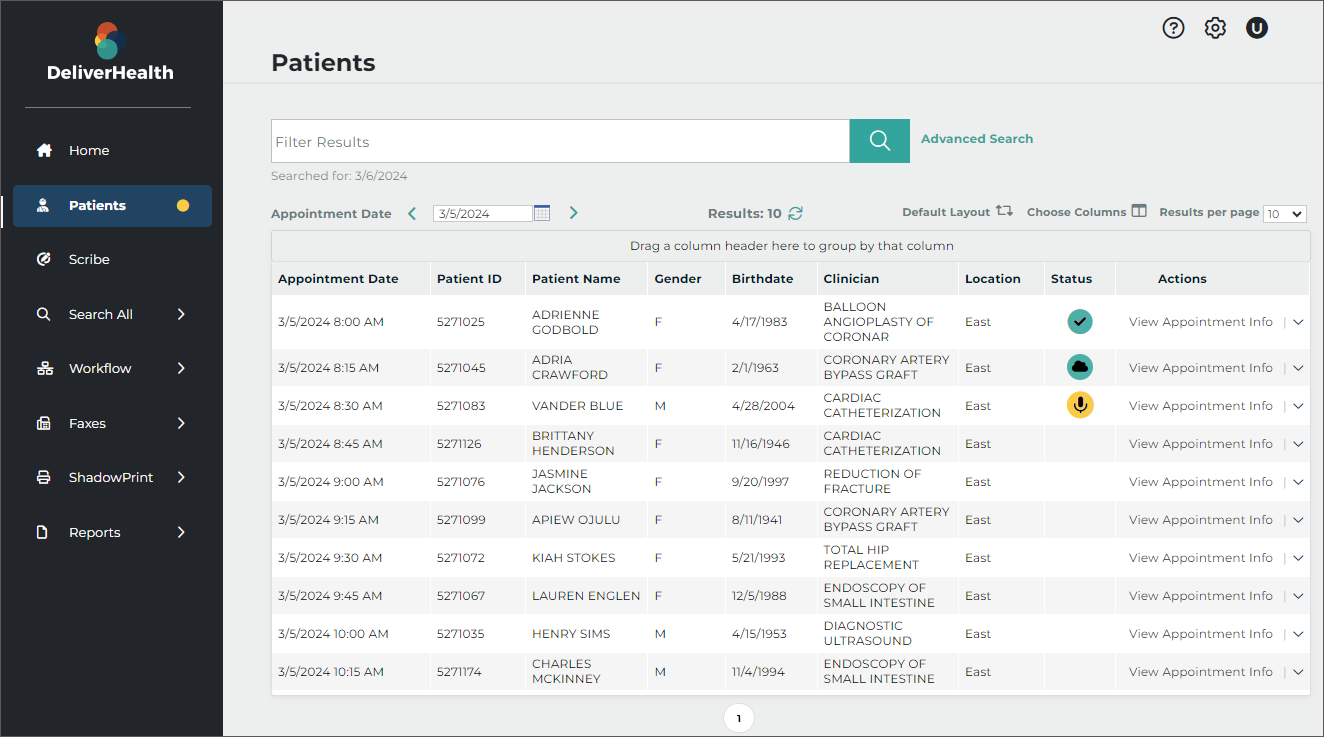
Upon opening the Patients tab, the current day's schedule loads based on schedule resources assigned to the logged-in user and the appointment data feed received from the client.
Patient Appointment Filter
To find a particular patient appointment, enter filter criteria in the filter box and press Enter or click ![]() .
.
Only the data fields displayed in the grid will be searched for matches. Clear the search box to display all appointments for the chosen date. A patient search cannot be performed without an appointment date.
Multiple data types can be searched at once by separating the data with a space. For example, to find an appointment with "Knee" in the appointment reason field and "Derk" in the patient name, type "knee Der" in the search text box.
 Click Advanced Search to enter additional search parameters.
- Contains - Search by full or partial data to match in any data field displayed in the search results grid.
- Patient First Name - Search by the patient's full or partial first name.
- Patient Last Name - Search by the patient's full or partial last name.
- Patient ID - Search by the patient's full or partial MRN.
- Appointment Date - Select a single date to search for the patient. This field is required.
- Resources - Specify which appointment resource code to filter by. Only resource codes assigned to the user will be displayed in the selection list. Select All to show matches from all resource codes.
- Order Number - Search by the full or partial appointment order number.
Click the clear button to remove all advanced search criteria and display all appointments for the selected date, or search to perform the patient search.
Tip
If the search criteria needs to be removed from Advanced Search use the clear button in the Advanced Search window; clearing the Search text box will not clear the Advanced Search criteria.
Patients Data Grid
The data grid displays patient appointments that match the search criteria and can be customized by changing the included fields, grouping, and sorting.

- Filter Results - Allows filters to be applied to the appointments for the given date.
- Advanced Search - Opens the Advanced Search window to apply search criteria to specific data fields.
- Searched for - Displays the submitted search criteria from Advanced Search.
- On-hold Dictation Indicator - A yellow dot appears in the Patients tab of the left navigation menu when a dictation has been recorded but not uploaded.
- Appointment Date - Type a date into the text field or click the calendar icon to choose a date from the calendar.
- Results - Displays a count of matching appointment records.
- Refresh - The refresh button performs the same search again.
- Default Layout - Resets the data grid to the default layout, removing any changes previously made to the included columns, grouping, and sorting.
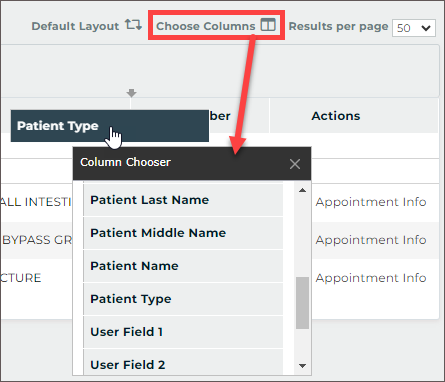
- Choose Columns - Opens the Column Chooser. Drag columns from the chooser to the desired location in the grid to add a new column. Drag a column from the grid to the Column Chooser to remove a column.
- Results per page - Choose how many appointment records to return per grid page.
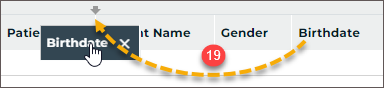
- Group - Drag any column header from the grid or Choose Columns window to the grouping row to group the results based on that data criteria. For example, drag Location to the grouping row to group all appointments at the same location together. Multiple groups can be added. Groups will automatically be used to sort the data. Click the group column to toggle between ascending and descending order.
- Sort - Click any column header to sort results by data in that column. Click the column header again to toggle between ascending and descending order. The sort order will be identified by an up arrow (ascending) or down arrow (descending). To sort by multiple columns hold the Shift key while clicking the column headers; data is sorted by the first column added to the sort, then by the second column added, and so on. To remove the sort from a column hold the Ctrl key while clicking the column header.
- Expand Group - Click + at the head of a collapsed group to display all records within the group.
- Collapse Group - Click - at the head of an expanded group to hide all records within the group.
- Status - Displays the dictation state for the corresponding appointment.
Blank - No dictations have been started or received for the appointment.
 The appointment has a dictation that has been started but not yet uploaded.
 A dictation has been uploaded for this appointment from another device.
 A recorded dictation for this appointment has been successfully uploaded from this device.
 - Expand all - Click to display all records for all groups.
- Collapse all - Click to hide records for all groups.
- Actions - A list of available actions to take. The default action is to view appointment details.
- Reorder - Drag and drop columns to reorder grid columns.
- Remove Column - Hover the mouse pointer over the column header and click X, or drag the column into the Choose Columns window to remove it from the grid.

Patients Actions
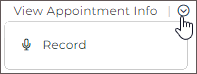
Two actions can be performed in the Patients tab. The default action will be performed when the Actions column text is clicked. Click the Actions menu expansion button ![]() to display an additional option.
to display an additional option.
View Appointment Info
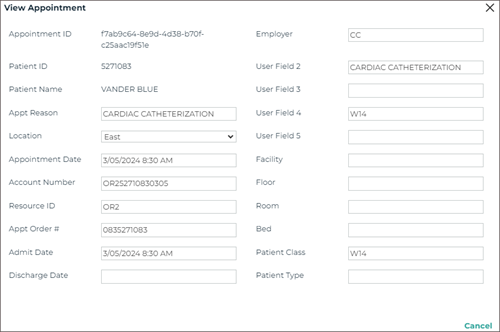
The default action in the Patients grid is to view the appointment details. Click View Appointment Info in the Actions column to open a read-only view of appointment information.
InQuiry Dictation

Dictations can be recorded and uploaded directly from InQuiry. A microphone device is required. Choose Record from the Actions menu to begin a new dictation or resume an on-hold dictation for the corresponding appointment. Dictations cannot be recorded without an appointment.
The New Dictation record window will open displaying the Patient ID, name and appointment date. The document type and location can be selected. If the user or client has a default document type and/or location, those will be pre-selected, but can be changed using the selection list. The STAT check-box allows the STAT status to be toggled on and off. Marking a dictation as STAT may incur additional charges.
Recording and Playback Controls
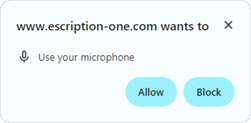
Click Start or the Record button  to begin recording. Access to the microphone must be granted to continue. There will be a slight delay while the microphone initializes. Audio is being recorded when "Duration" is displayed below the recording controls.
The Stop  buttons become active when recording or playback begins. Press either button to stop recording. Recording can be resume by pressing either record button. Additional dictation will always append to the end of the recording.
The recorded audio can be played back after recording has stopped. Press any of the three Play buttons to begin playback. The seek bar slider can be used to change the position of the playback, but does not change where additional recorded audio is inserted.
To increase or decrease the playback volume, hover the mouse over the speaker icon to open the volume slider, then click or slide the volume position as needed. Click the speaker icon to mute the playback volume.
Upload Dictations

After recording the dictation press the Complete button to upload it to eSOne. The New Dictation window will remain open until the upload has completed and a confirmation window appears. The appointment will display a check-mark in the Status column to indicate a dictation has been completed from InQuiry on this device.
An uploaded dictation cannot be played back from the Patients tab. Navigate to the Dictations folder in the InQuiry Workflow tab to play the dictation (note that the folder may have a different name).
If additional dictations are needed for the same appointment, select Record from the actions menu. Subsequent dictations will not be appended to the first dictation at the time of upload, but can be appended later in the workflow.
Save and Delete Dictations

To save a started dictation without uploading it, press On Hold. A confirmation message will display and the Status column will indicate a dictation has been placed on hold.
The left navigation menu will also have a yellow dot to indicate there is at least one dictation on hold in the Patients tab.
To complete or add to an on-hold dictation, choose Record from the Actions menu for the given appointment. The saved dictation will load. Press Record to append additional audio to the end of the dictation or Complete the dictation to upload it to eSOne.
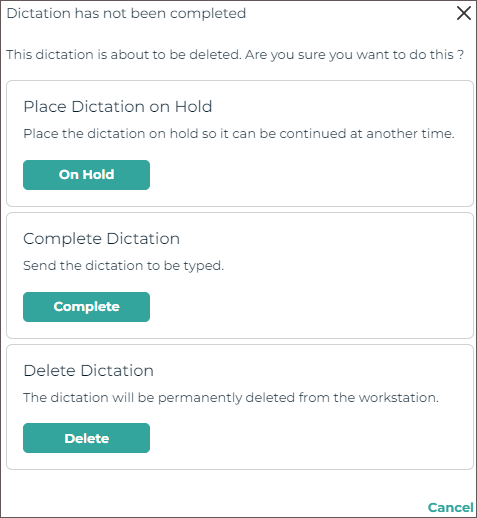
To delete a started or on-hold dictation open the record window, click Cancel, Delete, Close  or press the Esc key.
A dialog will prompt for an action: Place Dictation on Hold, Complete Dictation, or Delete Dictation. Choose Delete Dictation to remove the dictation without uploading it to eSOne. Once the dictation has been deleted it cannot be restored.